And that was summer
Greetings,
Doesn't time fly when you're having fun? When I published my last update on the 8th July I said I would aim to publish this next update late August, and here we are in early November. Inevitably I once again underestimated the scale of some of the house finishing tasks I had set myself, and wanted to complete those before giving my readers an update. But in addition I have also spent a considerable part of my summer just enjoying the weather while doing some exercise, a limited amount of local exploring, and enjoying the views from my decks while reading some good books and just "chilling."


 Further to that, with the initial two years of pretty intense pressure planning and then subsequently project managing my various contractors for the main build up to occupancy over, and then a year largely progressing subsequent finishing work inside, I decided to use this third summer in BC to get to know my Calgary weekend neighbours rather better. Most of them are out here every weekend during July and August, and some stay permanently for the best part of that two months, so I was determined to make the best of every social opportunity before they desert the place early September and return to Calgary for work and the kids school terms.
The weather this summer was excellent, with daytime temperatures in the high 20's and occasionally reaching mid 30's, and despite this region of BC being traditionally a semi arid climate, a fair amount of rain. But even in the mid 30's it remained a dry heat and therefore comfortable. More important, after the worry of the last two years of the worst two on record for wildfires, that intermittent rain was very welcome, and reduced the number and scale of wildfires to possibly below the average, with visibility clear after the last two summers of almost constant smoke haze. The only downside for my neighbours, who like to make maximum use of their power boats over the summer, was that last winters snowfall had been unusually low, and the US Army Chore of Engineers (who control the Columbia Basin dams south of the border) had completely miscalculated how much they dropped winter water levels at the Libby dam in readiness for Spring flood control - so while the mud banks shown in the photo above did eventually get covered, the lake level was a good 16 feet below full pull, limiting berthing options at our pontoon and causing the occasional grounding. I could have issued a few RN Form S232's (Report form for collisions and groundings).
While I mentioned in my opening paragraph I took some time to do a limited amount of local exploring, I still haven't had time to climb any of the magnificent mountains I can see to the north and east of me. But that which I have been to walk in a more leisurely manner, always armed with my can of bear spray, has been invigorating. Here's a few scenic photos of a walk I took up near a now derelict logging weir on the Bull River one early September afternoon. Very peaceful and not a human sound.


 With my desire to maximise summer social time, I ended up switching from the priority of serious finishing work to one that would maximise my summer enjoyment on my house's more than ample deck space and allow me to entertain outside. I already had outside seating arranged on the front wooden deck from last year ...

 ... but the covered concrete deck over the garage had remained a working space cluttered by various timber, chop saws and tools.
 So, on a sudden whim I went to work for two days to clear most of this mess, then vacuum and jet spray the concrete clear of all the sawdust that had accumulated. Then I purchased and assembled two sofas, and subsequently tested my practical skills by working out a design and then spending two and a half days building a wooden drinks table for that seating area. The table cost me nothing other than my time as all the materials were left over from previous construction work. e.g. the 2" thick tongue and groove (T&G) underside of my roof system, stain, varnish, screws, nails etc.
 In spite of the gate at the rear of the deck, I regularly get one type of wildlife visitor who manages to sneak underneath. Grouse, which quite simply are ridiculously timid and rather stupid.

 Fortunately that deck gate seems to deter other larger wildlife like these wild turkeys shown below (all of which looked rather worried in the run up to Canada's Thanksgiving weekend) ...
 ... or the deer that regularly graze around the house without now being at all concerned by my presence, and let alone the cougar I sited one evening at dusk ambling along the front of the house just below the patio wall. Sadly I was so astonished at actually siting a cougar, as they tend to avoid human habitation, that I didn't have time to grab my camera before it darted off, having seen me looking from the inside of the house. Nevertheless, not an animal that you want to be caught unawares by if you are outside. It is after all, while smaller than an African lion, also known as a mountain lion.
Having surprised myself that I could actually work out how to build that small table, my ambitions increased, and so I spent a couple of leisurely days looking on line with such sites as Pinterest to workout how to build an outdoor dining table for the covered deck. Construction is as shown below.

 Not allowing for my on line research, the actual task probably took me three, maybe four full days, but spread over more to allow for glue, stain and varnish to dry. While I had to buy the timber to make the legs, plus a fresh tin of stain and varnish, all totalling just under $160, the T&G table top, glue and GRK fasteners and normal wood screws were again essentially free leftovers. Overall, while the quality of my staining would not match professional standards, it's good enough for the rustic outdoor look I want (perhaps not for a dining table indoors) and the actual build is very solid and squared away. The dimensions are 8' long by 4' wide, as the 8' length meant I could get two lengths out of the 16' T&G pieces that remain stacked in my garage. My regret is with the size of this covered deck (32' by 27', perhaps I should have been more ambitious and made it 10' or 12' long. Never mind, there is enough space on the deck and enough material left in the garage to build another next year if I decide too. But making chairs in terms of my ability and use of time was not worth considering. After seeing some chairs one of my neighbours has on their deck I used a trip to Calgary to purchase ten from Structube, totalling $450. In the photo below you can see I have eight around the table, but the 4' width makes it quite comfortable to increase seating to ten people by placing two people at each end.

 The observant among you might note the thin layer of snow on the slope behind and to the side of the garage. My simple excuse is I forgot to take a photo of the finished arrangement until the 30th October. Hence you might also notice some winter firewood stacked in various locations on the deck for those days when the weather is too miserable to venture out to that stacked behind the house.
On that subject, while not house finishing, but nevertheless essential preparation for winter, I spent 4-5 days cutting up and splitting the residue of the logs that I had felled in September 2016 when clearing the build site and subsequently stacked higher up the hill to dry. As you can see from below, a reasonably substantial pile was reduced to nothing but sawdust remains on the hill and logs stacked at the back of the house.


 I started lighting winter evening fires in late September and now, while my wood burner on the main floor is not my main source of heat, it certainly is making a significant contribution in reducing my boilers winter propane gas consumption for the in-floor heating. In years to come I shall aim to cut a similar amount of wood on crown land. BC laws allow one to cut for free what is already felled or has died and fallen that the professional logging companies have disregarded as too small for their use. Free fuel except for ones time.
 So, having diverted my mid summer initial attention from essential house finishing tasks to those that supported outdoor relaxation and entertaining, plus a little essential wood cutting, let's turn to what I have achieved since mid July in terms of actual house finishing.
Essentially I have worked on three main tasks as follows: some trimming work on the open plan main floor; final work so that I could move my sleeping quarters from downstairs in the unfinished walk out basement to the master loft suite; and work preparing the concrete patio, entrance steps and garage aprons for a concrete pour.


My second big task was the work so I could finally move my sleeping quarters up into the loft. My last blog update showed the extensive work conducted up there in the early Spring in terms of the walk-in-closet build and wood trimming of the doors, windows, floor baseboard and T&G ceiling line, plus all the trimming of the rafters and beams. The big issue to build was a bed and bedside cabinets. I had planned all along to have a king size bed (6'8" long x by 6'4" wide - what I think in UK is known as a super king) to fill this bedroom space (19' wide by 15' deep where you pass the central column on the left and pony wall on the right that is effectively the transition area to the bathroom and walk in closet). But on looking around during late June and early July I got a shock at the cost to buy a solid wooden bed and bedside cabinets, let alone a mattress - anything between $3,000 and $5,000 plus another $1,000 on the cabinets, and another $2,500 for a really good mattress. That was never part of my original budget planning for the house build and spare funds weren't available to cover that sort of thing. So I set about researching my options on Pinterest and YouTube, and then creatively innovating on a design to, as far as possible, use materials I already had.
For the bed frame I did have to buy in some lumber plus the mattress support slats, as what I had left over from internal framing of the walls wasn't perfectly straight, and had to also buy some ⅝" lightweight T&G with which to make a headboard fixed directly to the wall, but all the nails, glue and GRK screw fasteners, plus stain and varnish was stuff I already had. Total cost of this bed frame and headboard - a mere $180 of new materials and five or six working days (again spread over a slightly longer period to allow for both the glue to dry when laminating or fixing parts of the frame together, and for stain and varnish to dry). Here's a quick walk through the build:


 My third big house finishing task was to finish building the patio facing wall, and also finish the levelling and compacting of the raised ground at walkout level.
As readers may recall from two previous updates end of last year (29th October 2018 "Take It Easy" and 29th December 2018 "It's Christmas Time") I had first started to build the facing wall with some irregular but much cheaper rock, which I then tore down and made a fresh start using a more expensive but better shaped rectangular rock, only to be defeated by the fact it became too cold in mid to late November for me to work outdoors. Whereupon I decided to leave it to this year. Well, inevitably, as you can read from all above, other tasks, rightly or wrongly, took precedence and all took my limited practical skill-set longer than initially anticipated. Anyway, realising mid September that the seasons were marching on, I turned back to dealing with the wall and preps for the concrete pour. What I thought would take me another 10-15 days turned into nearly 30 days of hard physical graft, ultimately working flat out with barely a break over the last few weeks. The issue comes down to what one of my prime contractors (Bob Damstrom, who did the timber component of this build) calls "sweat equity." As an example, last year I sought a quote to build that wall and steps from a local contractor. He quoted at $10,500, of which $2,500 was materials and the rest labour. To be fair, I've seen his work and it's excellent, and I now can see the justification to the $8,000 in terms of labour and machinery, but that additional money was beyond my resources. But being on my own, with no experience and certainly no machinery, the physical work to move rocks and work out how to build a consistent wall, plus infilling behind by wheel barrow and compacting, probably took me three, maybe four times as many man days as an experienced combined team of three would have taken. Do that maths - they'd have cracked this task well inside a week. In addition, had I asked for a quote to do the additional patio infill and compacting work plus rebar preps, and the same plus formwork for the garage aprons, I reckon that would have been another $2,000 to $5,000. Exhausting but probably $10,000 to $13,000 money saved on my sweat equity.
Below are some photos of the work undertaken, of which the steps caused me the biggest issue. Originally the plan had been to pour concrete steps, but in spite of going on line to look through the whole issue of combining the forms in order to pour the patio and steps in one concrete pour (as that would be more cost efficient) there was no obvious way to do this. A discussion with both my new concrete contractor and Dwight Hulbert (who I hold in similar esteem to Neil Johnson in terms of ranking my 17 contractors) indicated even they felt it was perhaps an ambitious aim that they might not undertake - and they certainly weren't anticipating my offering them this work as they know my budget is tight, and unlike some local contractors that I generally weeded out during the selection process, gouging their client is not their style. So I then considered doing a concrete scree wall where the wooden steps would subsequently be bolted into and placed on a concrete pad, and then getting Bob D to make me a set of wooden steps. Days pondering that option, building initial concrete forms, only to eventually change tack again as it wouldn't have provided the end aesthetic result I wanted. Ultimately, having sketched out my measurements to make sure everything will comply with building code for tread depth and rise, I got Golden Rock Products (my supplier of the rock wall materials) to cut from rock four step slabs and three risers. Weighing some 1,400 lbs, these were loaded into the cargo bay of my truck. Back home, as the step slabs weigh about 220 lbs each, I got a neighbour to assist me with unloading. Then having borrowed on loan Dwight's tamper/compactor, brand name "Wacker" (which amused me as it reminded me of the nickname of an RN friend who has the surname "Payne"), I spent almost three days installing them, gradually raising and sliding each slab into place using a system of wood levers and wedges, as clearly I could not lift them on my own. A team of two, experienced in this job and with the right equipment could have probably done this in less than a day once the slabs were on site, but once again that would have cost me.


 The funny thing while doing this was I ended up exchanging WhatsApp texts with texts with my brother in Rio, and on seeing what I was doing he came back warning me to watch my back. I eventually did injure it, not by moving the slabs, but at the end of the day while putting equipment away I was so physically exhausted that I ended up tripping backwards and crashed down on my butt, back and right shoulder. My back and butt was heavily bruised and sore for 10 days afterwards - but at least it wasn't my historic disc issue that would have immobilised me for a week or more, nor did I hit my head.
As you can see I have two risers, and three slabs, with the top slab being at the right height to have the concrete patio meet it. The compacted gravel you see at the lower end is a plan on hold. Basically I have one more riser and slab as a spare, and depending on the final grade profiling I do next year out from the garage aprons will determine if the grade meets that slab or if I need to slide the lower slab out and put one more riser and step level below it. Essentially a matter of deciding the grade slope from the garage by 4" to 5".
Follow on tasks were to bring the wall in to meet the steps and infill and compact behind, plus do some minor tweaking on the level all along the wall as best as one can get when using a natural rock rather than a factory produced synthetic stone or brick, followed by final compacting, and then placing and tying off the rebar at 18" spacing. In the following photos, the wood slats you may notice will be removed before the final concrete pour and are purely there to allow me to attain my levels for the slab an average 4" thickness, and then to calculate a slight slope on the outside of the deck posts to the wall. That final slope will allow any rain that deposits to drain away where the above deck and extended prow wall roof doesn't offer shelter.


 Those last 6 photos were taken on 30th October, and you will notice the snow on the ground. My new concrete contractor (no longer using or recommending my previous one) and I had planned to pour on Tuesday 29th October. I was in fact ready a week before, but his programme was full. Then the temperatures plunged unseasonably low for so early in the Fall, below O deg C by day and below -14 deg C at night . We rescheduled to the Thursday 31st, but in spite of the weather forecast a few days earlier being for milder weather, the forecasters got it wrong and temperatures were still unusually frigid. In those conditions, even with an accelerant and the placing a thermal tarpaulin at night, you just can't be assured of a good cure - with consequent degraded concrete and cracking. Noting the not inconsiderable cost of the concrete and his services, our discussions led to a decision to hold off until next April in order to ensure I get value for money. I was somewhat morose for a day or so as so much work had gone into this and it's one more backlog to deal with in terms of finishing downstairs next Spring. But to use that dreadful Canadian expression when admonishing a child, I just have to "suck it up." Maybe I shouldn't have focused on some fun tasks (like the deck furniture and finally unpacking all my pictures and RN, diving career and schoolboy rowing memorabilia after 3 years), a mass of social time in July and August, or walks to enjoy the views in this area - but at the end of the day "all work and no play makes Jack a dull boy" and after three years here it was time to start appreciating why I moved to the mountains of BC and, to misquote my blog title, "left city life behind." Hopefully I can achieve the pour early to mid April, as I have my mother visiting mid May for two weeks and other close friends second week of June, and I don't want these building site issues at the entrance to the house by the time they arrive. Based on looking back through my photographic record and identifying that the footings for the house were poured on the 10th April 2017, I am fairly confident this delay is containable.
So what are the internal finishing plans for the winter. There remains much work to do inside the house, and I have decided my order of priority is as follows. First, some minimal work in the Great Room to both box in the fireplace external air supply duct and finish some minor trim around cabinets etc, plus fit a door to the gaping exit off the dining area to the laundry and half bathroom. Second to finish that half bathroom and laundry area - which as I mentioned much earlier, is functional but otherwise pretty basic. Third, downstairs, working one bedroom and en suite bathroom at a time, trim out both in terms of main doors, closet (wardrobe) doors, baseboards, and hanging either curtains or blinds, ready to host my guests next May and June in comfort. Thereafter, but of less importance in terms of hosting, trim out the window bucks, doors and baseboards in the family room. Fifth, and possibly after my visitors in May and June, the stairwell finishing, particularly in terms of trimming the gable trapezoid windows that look under the roof extending over the concrete deck, and for which I may well employ somebody to do that work rather than my having to rig scaffolding ad work aloft myself. That eventual decision depends on income flow, which leads into the next para.
My part time contract consulting work has been running since last April at an average of 34% of the anticipated 100 hours a month. Not helped by the fact my client has to deal with the counter productive vagaries, frustrating politics and inter company bickering that seems to characterise and delay Canadian defence procurement, as I well know from my time working in DND. I hold my breath as I write, but with them about to sign two new contracts, the outlook may be for a much better pace of work over the winter. While I will have to balance my time with paid work versus the house finishing tasks listed above, the income is much needed in order to remove the delta and buy things like sun shades for the Great Room and drapes (curtains to those in UK) for my loft bedroom. Subject to being on schedule with the house, work might also fund a little bit of globe trotting in February or early March, with the intention of being back by the beginning of April for that concrete pour.
I shall aim to provide another update sometime in late January / early February, hopefully showing my work plan has progressed through the three priority tasks listed above in order to host visitors in May and June.
Using Tigger's farewell exclamation in Winnie the Pooh (one of my two favourite childhood books),
TTFN (Ta Ta for now)
.


The weather this summer was excellent, with daytime temperatures in the high 20's and occasionally reaching mid 30's, and despite this region of BC being traditionally a semi arid climate, a fair amount of rain. But even in the mid 30's it remained a dry heat and therefore comfortable. More important, after the worry of the last two years of the worst two on record for wildfires, that intermittent rain was very welcome, and reduced the number and scale of wildfires to possibly below the average, with visibility clear after the last two summers of almost constant smoke haze. The only downside for my neighbours, who like to make maximum use of their power boats over the summer, was that last winters snowfall had been unusually low, and the US Army Chore of Engineers (who control the Columbia Basin dams south of the border) had completely miscalculated how much they dropped winter water levels at the Libby dam in readiness for Spring flood control - so while the mud banks shown in the photo above did eventually get covered, the lake level was a good 16 feet below full pull, limiting berthing options at our pontoon and causing the occasional grounding. I could have issued a few RN Form S232's (Report form for collisions and groundings).
While I mentioned in my opening paragraph I took some time to do a limited amount of local exploring, I still haven't had time to climb any of the magnificent mountains I can see to the north and east of me. But that which I have been to walk in a more leisurely manner, always armed with my can of bear spray, has been invigorating. Here's a few scenic photos of a walk I took up near a now derelict logging weir on the Bull River one early September afternoon. Very peaceful and not a human sound.


Having surprised myself that I could actually work out how to build that small table, my ambitions increased, and so I spent a couple of leisurely days looking on line with such sites as Pinterest to workout how to build an outdoor dining table for the covered deck. Construction is as shown below.


On that subject, while not house finishing, but nevertheless essential preparation for winter, I spent 4-5 days cutting up and splitting the residue of the logs that I had felled in September 2016 when clearing the build site and subsequently stacked higher up the hill to dry. As you can see from below, a reasonably substantial pile was reduced to nothing but sawdust remains on the hill and logs stacked at the back of the house.


Essentially I have worked on three main tasks as follows: some trimming work on the open plan main floor; final work so that I could move my sleeping quarters from downstairs in the unfinished walk out basement to the master loft suite; and work preparing the concrete patio, entrance steps and garage aprons for a concrete pour.
So, first, to show you work undertaken on the main floor, where initially, shortly after last writing I did some trim work around the back door, rather than live any longer with the eye sore of bare framing bucks and sticky labels on the windows, as shown here ...

... to end up with the finished look shown below.

Work also focused on finishing fitting baseboards and trimming around the four faux posts, and replicating the baseboards at ceiling level by fitting an identical piece as coving. Trimming around the faux posts was not an easy task as timber posts are never 100% straight and even occasionally twist marginally while going through their acclimating process - which resulted in my regular swearing when I found join angles for the various bits of trim were not the anticipated 45 degrees and thus required several experimental attempts to tweak the angles to get a decent join.

By comparison, trimming along the drywall join to the posts was an absolute doddle.

The following three photos give you a feel for the finished effect in the dining and kitchen area (noting in one photo I clearly took it out of sequence as the baseboard wasn't fitted - trust me it was shortly afterwards as you can see from the photo just above).


A finicky job that took many hours (and did my neck and occipital nerve pain issues no good) was the hanging of all the miniature glass pieces for my dining room table overhead light - transforming it from the paper clad frame you can see in the photo two above, to ...

All in all I spent about 5 days on what I have shown you above by the time I had ripped and trimmed wood to size, sanded and stained it, and fitted. There remains quite a lot still to do to complete work on this floor as follows: some trim at kick level for kitchen units, trimming around the wood burner tiles and fitting a cover to hide the air feed intake that comes through the floor behind the wood burner from outside with a suitable cover, fitting of a door with a transom light to the laundry, finishing the half bathroom in the laundry area, and hanging of pictures. The half bathroom currently has no window or door trims or baseboards, no back splash, and is not even painted - usable but rather basic. And when earnings allow I will be buying my wine and beverage fridges to fit under the counter in the first two of the fours photos you see above. Maybe early next summer I might do a drive over to the winery's of Kelowna and Penticton in the Okanagan Valley to buy sufficient wine to stock the wine fridge.
My second big task was the work so I could finally move my sleeping quarters up into the loft. My last blog update showed the extensive work conducted up there in the early Spring in terms of the walk-in-closet build and wood trimming of the doors, windows, floor baseboard and T&G ceiling line, plus all the trimming of the rafters and beams. The big issue to build was a bed and bedside cabinets. I had planned all along to have a king size bed (6'8" long x by 6'4" wide - what I think in UK is known as a super king) to fill this bedroom space (19' wide by 15' deep where you pass the central column on the left and pony wall on the right that is effectively the transition area to the bathroom and walk in closet). But on looking around during late June and early July I got a shock at the cost to buy a solid wooden bed and bedside cabinets, let alone a mattress - anything between $3,000 and $5,000 plus another $1,000 on the cabinets, and another $2,500 for a really good mattress. That was never part of my original budget planning for the house build and spare funds weren't available to cover that sort of thing. So I set about researching my options on Pinterest and YouTube, and then creatively innovating on a design to, as far as possible, use materials I already had.
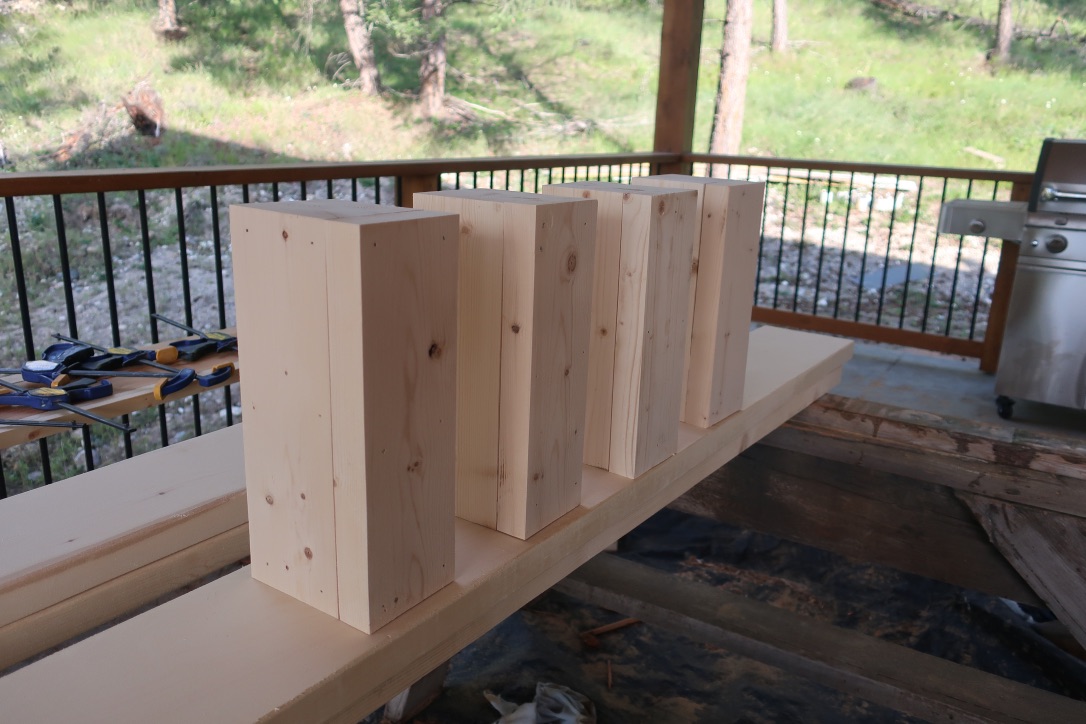
For the bed frame I did have to buy in some lumber plus the mattress support slats, as what I had left over from internal framing of the walls wasn't perfectly straight, and had to also buy some ⅝" lightweight T&G with which to make a headboard fixed directly to the wall, but all the nails, glue and GRK screw fasteners, plus stain and varnish was stuff I already had. Total cost of this bed frame and headboard - a mere $180 of new materials and five or six working days (again spread over a slightly longer period to allow for both the glue to dry when laminating or fixing parts of the frame together, and for stain and varnish to dry). Here's a quick walk through the build:
First, as shown by two photos below, I cut to size, sanded, glued and nailed successive laminated layers in order to produce a very strong set of four corner bed legs initially 4½" x 6" thick. These actually subsequently became thicker by fitting additional supports under the bed rails, as you will be able to pick out later. Probably unnecessary, but better to be safe. I like things over-engineered and strong!

I then attached the legs to the 2" by 8" lumber used to make the head and base rail ends, and added a strengthening support under the rails, binding all together with more glue, 4" plus GRK fasteners and clamping while everything set. Then I applied two layers of stain followed by three layers of varnish.

In the next photo you can also see the two main side rails, again made using 2" by 8" lumber. The two wood blocks you can also see fitted on the inside of the head and base rails are there to take the two central slat supports (two rather than one as the bed is 6'4" wide (whereas a Queen at 5' wide can get away with only one central support).

Thereafter, on moving all up to the loft, and using set squares and much patience to ensure everything was squarely aligned, I attached the side rails to the legs, this time using 6" GRK fasteners (but did not glue in this case, just in case I ever want to disassemble and move the bed frame to another house - unlikely) and then fitted an additional layer to the legs to provide support below each of the side rails (even though in theory the multiple GRK's offer in excess of a 1000 lbs of load bearing strength at each corner).

Then, ensuring my height above floor measurements for the slat side supports aligned, I glued, wood screwed and temporarily clamped 2" by 4" lumber to the side rails while the glue set.

Next, as shown below, the central slat supports were put in place and check measured against the side supports for height and each fitted with a support leg in the middle to share the load between the blocks on the head and foot rails. I am relieved to say that while my heart was in my mouth as I did the final check measuring, everything aligned for mattress height absolutely 100%. The lightweight ⅝" T&G headboard was then finish-nail pinned to the wall studs, stained and varnished.

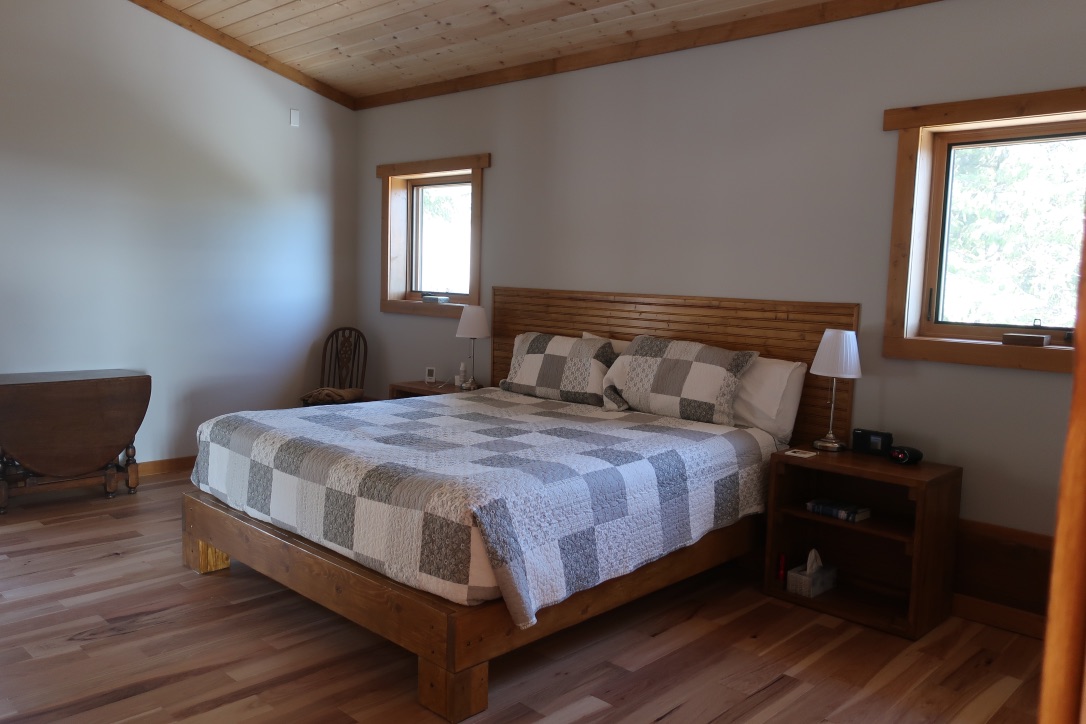
Finally, as shown below, completed with slats fitted and the headboard edge fitted with a finishing trim to hide any slight irregularities. I am pleased to say, that even with my over engineering, the frame comparatively weighs no more than the wooden queen sized bed with attached headboard downstairs. The only thing I did thereafter was to fit cushion pads under all side and central legs so as to protect the wood floor.

The subsequent construction of two bedside cabinets using left over 2" T&G from my roof system, took me another two full working days, but again I spread this over more to allow for stain and varnish to dry. Cost was essentially nil as all materials were left over items from other work.

So, in the final analysis, rather than spending between $3,000 and $5,000 on a smart wood bed frame and a $1,000 on bed side cabinets, my eight days work and $180 on additional materials was pretty good value.

But, as unfortunately my new found skills do NOT extend to making a mattress, and with a history of back problems that is one area I would not skimp on spending. To use an old adage, one should never cheap out on a mattress as you spend at least a third of your life on it. The mattress was delivered mid August.

Early September, my electrician, Neil Johnson (who rates one of my two best out of 17 contractors) popped back to fit both my baseboard heater that you can see just off to the right in the photo above, the thermostat control for the bathroom area electrical under tile heating, and wire up my two bathroom LED mirrors. While the main floor and downstairs are in floor hydronic heating, at house design stage I avoided the significant infrastructure expense of doing the same in the loft. Electrical heating, while very cheap to fit, is significantly more expensive to run, but I worked on the assumption at design that sufficient heat will rise from the main floor to avoid running these electrical options except maybe when we get occasional winter cold snaps down to minus 20C figures.
Never having had such a big bed, next purchase was bed linen. Another trip to Calgary in September as there generally isn't much quality or choice in this very rural area. But with other tasks ongoing it wasn't until two weeks ago (Friday 25th October), after two days deep cleaning that I eventually moved my sleeping arrangements up to the master suite. I have yet to sort what final furnishings I put up there, let alone hang pictures and mirrors, and intend to buy and install a flat screen TV. All in good time and for the TV, when income from my part time contract consulting work allows. But overall I am very pleased with the result. Readers may pick out in the following tour that I have also yet to fit the internal window, trim out where the tree trunk ridge beam goes through drywall into the walk-in-closet, and still need to trim the ceiling to drywall join in the loo. Not urgent and anyway, the internal window will remain open most of the time to allow heat in from the floor below in winter, and cooling breezes at night in summer via the main floor front wall transom windows, unless I have guests sleeping on the Great Room sofas and I want total privacy.


As readers may recall from two previous updates end of last year (29th October 2018 "Take It Easy" and 29th December 2018 "It's Christmas Time") I had first started to build the facing wall with some irregular but much cheaper rock, which I then tore down and made a fresh start using a more expensive but better shaped rectangular rock, only to be defeated by the fact it became too cold in mid to late November for me to work outdoors. Whereupon I decided to leave it to this year. Well, inevitably, as you can read from all above, other tasks, rightly or wrongly, took precedence and all took my limited practical skill-set longer than initially anticipated. Anyway, realising mid September that the seasons were marching on, I turned back to dealing with the wall and preps for the concrete pour. What I thought would take me another 10-15 days turned into nearly 30 days of hard physical graft, ultimately working flat out with barely a break over the last few weeks. The issue comes down to what one of my prime contractors (Bob Damstrom, who did the timber component of this build) calls "sweat equity." As an example, last year I sought a quote to build that wall and steps from a local contractor. He quoted at $10,500, of which $2,500 was materials and the rest labour. To be fair, I've seen his work and it's excellent, and I now can see the justification to the $8,000 in terms of labour and machinery, but that additional money was beyond my resources. But being on my own, with no experience and certainly no machinery, the physical work to move rocks and work out how to build a consistent wall, plus infilling behind by wheel barrow and compacting, probably took me three, maybe four times as many man days as an experienced combined team of three would have taken. Do that maths - they'd have cracked this task well inside a week. In addition, had I asked for a quote to do the additional patio infill and compacting work plus rebar preps, and the same plus formwork for the garage aprons, I reckon that would have been another $2,000 to $5,000. Exhausting but probably $10,000 to $13,000 money saved on my sweat equity.
Below are some photos of the work undertaken, of which the steps caused me the biggest issue. Originally the plan had been to pour concrete steps, but in spite of going on line to look through the whole issue of combining the forms in order to pour the patio and steps in one concrete pour (as that would be more cost efficient) there was no obvious way to do this. A discussion with both my new concrete contractor and Dwight Hulbert (who I hold in similar esteem to Neil Johnson in terms of ranking my 17 contractors) indicated even they felt it was perhaps an ambitious aim that they might not undertake - and they certainly weren't anticipating my offering them this work as they know my budget is tight, and unlike some local contractors that I generally weeded out during the selection process, gouging their client is not their style. So I then considered doing a concrete scree wall where the wooden steps would subsequently be bolted into and placed on a concrete pad, and then getting Bob D to make me a set of wooden steps. Days pondering that option, building initial concrete forms, only to eventually change tack again as it wouldn't have provided the end aesthetic result I wanted. Ultimately, having sketched out my measurements to make sure everything will comply with building code for tread depth and rise, I got Golden Rock Products (my supplier of the rock wall materials) to cut from rock four step slabs and three risers. Weighing some 1,400 lbs, these were loaded into the cargo bay of my truck. Back home, as the step slabs weigh about 220 lbs each, I got a neighbour to assist me with unloading. Then having borrowed on loan Dwight's tamper/compactor, brand name "Wacker" (which amused me as it reminded me of the nickname of an RN friend who has the surname "Payne"), I spent almost three days installing them, gradually raising and sliding each slab into place using a system of wood levers and wedges, as clearly I could not lift them on my own. A team of two, experienced in this job and with the right equipment could have probably done this in less than a day once the slabs were on site, but once again that would have cost me.


As you can see I have two risers, and three slabs, with the top slab being at the right height to have the concrete patio meet it. The compacted gravel you see at the lower end is a plan on hold. Basically I have one more riser and slab as a spare, and depending on the final grade profiling I do next year out from the garage aprons will determine if the grade meets that slab or if I need to slide the lower slab out and put one more riser and step level below it. Essentially a matter of deciding the grade slope from the garage by 4" to 5".
Follow on tasks were to bring the wall in to meet the steps and infill and compact behind, plus do some minor tweaking on the level all along the wall as best as one can get when using a natural rock rather than a factory produced synthetic stone or brick, followed by final compacting, and then placing and tying off the rebar at 18" spacing. In the following photos, the wood slats you may notice will be removed before the final concrete pour and are purely there to allow me to attain my levels for the slab an average 4" thickness, and then to calculate a slight slope on the outside of the deck posts to the wall. That final slope will allow any rain that deposits to drain away where the above deck and extended prow wall roof doesn't offer shelter.


The photos below show the form work for the garage aprons which project 5'6" from the garage slab. That measurement was deliberate, as the eaves troughs on the above roof overhang at 3', and just occasionally during a really freak torrential down pour they cannot carry away all the rain and thus overflow, which leads to a fine mud spatter on the bottom of my cedar garage doors. No more.


So what are the internal finishing plans for the winter. There remains much work to do inside the house, and I have decided my order of priority is as follows. First, some minimal work in the Great Room to both box in the fireplace external air supply duct and finish some minor trim around cabinets etc, plus fit a door to the gaping exit off the dining area to the laundry and half bathroom. Second to finish that half bathroom and laundry area - which as I mentioned much earlier, is functional but otherwise pretty basic. Third, downstairs, working one bedroom and en suite bathroom at a time, trim out both in terms of main doors, closet (wardrobe) doors, baseboards, and hanging either curtains or blinds, ready to host my guests next May and June in comfort. Thereafter, but of less importance in terms of hosting, trim out the window bucks, doors and baseboards in the family room. Fifth, and possibly after my visitors in May and June, the stairwell finishing, particularly in terms of trimming the gable trapezoid windows that look under the roof extending over the concrete deck, and for which I may well employ somebody to do that work rather than my having to rig scaffolding ad work aloft myself. That eventual decision depends on income flow, which leads into the next para.
My part time contract consulting work has been running since last April at an average of 34% of the anticipated 100 hours a month. Not helped by the fact my client has to deal with the counter productive vagaries, frustrating politics and inter company bickering that seems to characterise and delay Canadian defence procurement, as I well know from my time working in DND. I hold my breath as I write, but with them about to sign two new contracts, the outlook may be for a much better pace of work over the winter. While I will have to balance my time with paid work versus the house finishing tasks listed above, the income is much needed in order to remove the delta and buy things like sun shades for the Great Room and drapes (curtains to those in UK) for my loft bedroom. Subject to being on schedule with the house, work might also fund a little bit of globe trotting in February or early March, with the intention of being back by the beginning of April for that concrete pour.
I shall aim to provide another update sometime in late January / early February, hopefully showing my work plan has progressed through the three priority tasks listed above in order to host visitors in May and June.
Using Tigger's farewell exclamation in Winnie the Pooh (one of my two favourite childhood books),
TTFN (Ta Ta for now)
.
Comments
Post a Comment