"Under Pressure"
Greetings,
As my last update was dated 13th May I clearly didn't succeed in my stated 3-4 weeks for this next one. Five weeks on, this last few weeks has been a 12 hours a day 6½ days a week occupation. More recently, as if to suggest I might be going a trifle mad, I can't get stop the echoing in my head of the lyrics from the Bowie/Queen 1982 release of "Under Pressure," hence the title of this latest post. Most of the recent work has been centred on items inside the house that will lead to a point where I can request my occupancy inspection, and if that inspection is successful, move in. That by no means means the place will be complete. For occupancy, the building inspectors require all safety features in place (e.g. guardrails, stair hand rails, insulating foam to be covered by drywall or other wood materials that will delay the spread of a fire to this material sufficiently to allow escape) plus a functioning kitchen, bathroom, bedroom and basic living area. With that in mind much of my current effort is to get the daylight walkout basement (essentially the ground floor when looking at the front of the house) sufficiently completed in order to provide a reasonably finished and comfortable living and sleeping accommodation, and on the main floor get the kitchen area completed. In the loft, other than fitting tongue and groove to the ceiling of the master bedroom in order to cover the insulation in the conventional framed roof that was sprayed from below (see "Purple Rain" dated 24 September 2017), as this exposed spray foam would not be accepted at the occupancy inspection for reasons of fire safety, my intention is to complete the rest of the loft bedroom and bathroom suite after moving in. I am aiming for occupancy third week of July. We will see!
My last update showed the installation of my 5 foot wide and heavy timbers stairs. Bob Damstrom was back on site a couple of weeks later to install the stair guardrails that you can see on the right of the following photos, and a handrail on the left, plus the guardrails to the loft gallery, and the small loft bedroom deck. These are all safety features that have to be in place for occupancy. Here's a quick tour up the stairs (protective cardboard remaining in place until much of the work inside is complete).
First, looking from the entrance lobby at the first flight to the half landing.


 Next, from the main floor to the next half landing.
 From that half landing looking up to the loft landing.

 Next, looking from the top landing along the 4 ft wide loft gallery access to the master suite ...
 ... and looking from the end of the loft gallery back to the stair well.
 Finally from below looking from the Great Room on the main floor up at the loft gallery. In this photo Bob Damstrom will later be dressing that structural dropped LVL (Laminated Veneer Lumber) beam in timber.
 Bob has also finally fitted the guardrails to the small loft deck or balcony at the back of the house.


 Just after writing my last update I got my kitchen out of its storage at Williams Storage in Cranbrook (thus reducing one of my many monthly outgoings) and hauled it in two loads on my 18' trailer back to the build site for off-loading and moving up to the main floor. A physical couple of days work, but rather better than paying Williams $500 or so for doing this for me. With the assistance of Chris Walch, my current landlord and build mentor, we did the initial fitting of the kitchen units and cook island extractor fan. Readers may recall that I had to fit blocking in the joist space above to support this extractor fan before my dry-waller covered the ceiling.
As you can see in the next photos, the layout provides plenty of wall countertop space, a big cooking island and an additional three person breakfast bar. I'll give you a quick tour.
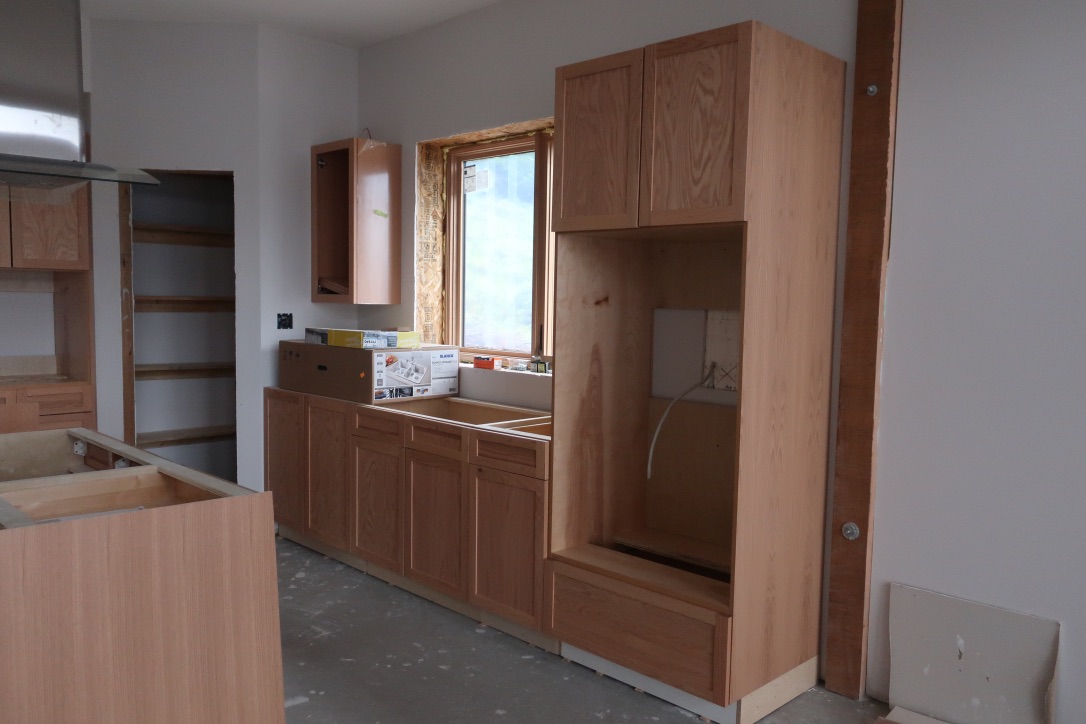
First, on the North East wall adjacent to the pantry in the corner is where the kitchen sink will be fitted, plus a tall cabinet for my double oven.
 The next two photos looking from one side of the Great Room, show the breakfast island, the main cooking island, the back North West wall of drawer cabinets, and the microwave tall cabinet next to the pantry. My fridge, will go to the right of those back wall drawer cabinets, just where you can see the sides currently leaning against the wall by the back door. I will fit the fridge cabinetry once the fridge is delivered.

 In this next photo you can just pick out on the left hand side of the rear wall a single cupboard central under the window. The intention here is to have a wine fridge on one side and a beer fridge on the other, conveniently in the dining area and preventing guests getting under my feet while I cook.
 And finally in the next photo, looking from the dining area.
 While generally very pleased with the quality and look of the cabinets which are constructed in plywood rather than cheaper strand board or OSB/MDF and then faced with a light stained oak veneer, two things have annoyed me somewhat:
That all said I now know I shall be receiving these items week after next. In terms of further finishing of the kitchen, I am expecting delivery of my larder fridge, gas cook top, double oven, microwave and dishwasher in the next two weeks, and so, along with the aforementioned items to correct the cabinet deficiencies, I should be able to complete the kitchen cabinet installation by the time I do my next update. As for counter tops, I made a decision and last week ordered my wooden counter tops from RBM Lumber in Columbia Falls, Montana - the same company that made my front door. I had considered granite, but the cost is six times greater, and in an attempt to stay within my overall budget, granite was outside my resources. Having visited RBM Lumber two weeks ago to look at how they make and lacquer finish countertops to provide protection, I am confident that they will deal with any food or liquid splashes, but I will need some metal or stone griddles around my gas cook top for placing any hot pots and pans on. While a compromise, I think the wood option will look good and be in keeping with the post and beam and other timber features of the house.
I ordered my cedar fronted garage doors way back last summer, but these have sat in Duffy's Doors workshop since September, with Mike and Jody Duffy being very patient while I deal with the various stalls in building. The week before last I spent time in their workshop staining both sets of doors - again doing his myself to keep within my budget. In the following photos you will see one set stacked to dry, and the other set on trestles immediately after staining.

 I had hoped to have the garage doors fitted last week, but both on my side and Mike's, things just got in the way and plans had to be changed. Hopefully middle of this next week. Soon I will have a secure storage place for materials without cluttering the inside of the house, giving me a clearer work space inside to get things done.
I also took delivery a week ago of my various bathroom vanities and the basement family room wet bar, and again some of these have been fitted, as ever with some help from Chris Walch. Another quick tour ...
This is the vanity in the basement shower bathroom, fitted and secured to the wall and awaiting my decision on sink, faucets and counter top.
 I have yet to fit the vanity you see below in the other basement bathroom where I have a shower/bath tub, as the way the plumber has routed the plumbing is causing me a problem. I will wait until he comes back on site to work this one out


 ... the hearth for the forthcoming fit of my wood burner stove in the Great Room, 18" in front of the main central column...
 ... and pantry floor.
 I have also built my pantry shelves as shown below, having taken a good look at the example in Chris's house and managed to do this work on my own. The photo below shows the initial build prior to then removing them for clear coat varnish staining and the floor tiling. Before reinstalling later this week I will need to trim the height of the bottom support post to account for the addition of mortar and tile.
 Chris has also been key to helping me tile the shower in one of the two basement bathrooms, as shown below. There is a little more tiling to be done on the shower kerb and adjacent walls which I again hope to complete this next week.
 But the task of tiling the entire basement floor, consisting of two bedrooms and en suite bathrooms, the family room, and lobby and its powder room, totalling over 1400 sq ft of floor, has been an immense task. Tiled floors are not the norm in this part of the world, unlike the Mediterranean and Middle East, but I have always liked their look and simplicity for cleaning and care. No need to remove shoes in the standard Canadian manner when downstairs - although upstairs where wooden floors are planned, a different matter. The entire basement floor is now tiled, and the grouting is about 35% done. As a quick look, while the tiles will need a good wash to get rid of the hazy sheen left by the grout application yesterday, the following gives an initial impression. It's not 100% perfect, but I've seen professionals do no better, and when my quotes last year ranged between $7K and $10K for so called professionals, I had to accept that cost was not an option. Overall I am pleased with the general effect and know once the grouting is complete and the floor is really clean, I will savour the result. Here's a quick tour...
First, the en suite shower bathroom to one of the downstairs bedrooms.
 Next, looking from the bedroom into that same bathroom
 That bedroom floor is now fully grouted and just needs a good wash this next week to remove the last of the grout haze and sharpen up the finish.
 Two photos below of the walkout basement family room, but the grouting work will continue this next week.

 I think viewers will approve of my choice of slate like tile with those superb hues of dark grey, browns and near reds, and the final effect I have achieved is very similar to the display in the Home Hardware store. That said, this took a little discussion with Home Hardware. On choosing this tile I ordered 105 cases, sufficient to cover 1400 sq ft, plus a margin for cutting and breakages. On being told that the tiles had been received in store I decided to go in and open a few boxes. I found that in excess of 10% were a very boring light grey that in no manner matched the tones represented in the display. A discussion was had where I pointed out that their suppliers display was far from a fair representation, and that such misrepresentation is legally highly questionable. After threatening to cancel my order it was agreed I could take delivery of an additional quantity so that I could weed out those tiles that did not match the display tones and return - yesterday I returned in excess of 210 sq ft of tiles.
So, some frustration while running back and forth in ever decreasing circles with certain suppliers and having to firmly stand my ground. Time wasted, but really I am not surprised, as in 12+ years of living in Canada I have found that most people just will not argue their case and then get walked over. My rather more blunt attitude when dissatisfied comes as something of a shock, especially when I will not let them work on the assumption that if they ignore the customers demands the problem will go away. Unlucky - it doesn't! Just as certain contractors have found out in the last year if trying to get away with things on site.
But overall, while working perhaps just a little intensely at present, and so feeling somewhat "knackered" at times, the overall satisfaction is that the build is now maturing into a real home. Much work still to do, both to be able to get my approval to move in this late July, and then finish it off inside thereafter (let alone landscaping a garden next year) but I remain enthusiastic about the end result. Soon I will be able to sit on one of my decks with a glass of wine and enjoy those stunning views. There is much work planned in outline for the next few weeks in order to achieve the goal, including my electrician and plumber coming in so that we can get their area of work finished on two of the three floors to make the house habitable, but I am not going to predict how much will be achieved, however tempting. Until my next progress report.
As my last update was dated 13th May I clearly didn't succeed in my stated 3-4 weeks for this next one. Five weeks on, this last few weeks has been a 12 hours a day 6½ days a week occupation. More recently, as if to suggest I might be going a trifle mad, I can't get stop the echoing in my head of the lyrics from the Bowie/Queen 1982 release of "Under Pressure," hence the title of this latest post. Most of the recent work has been centred on items inside the house that will lead to a point where I can request my occupancy inspection, and if that inspection is successful, move in. That by no means means the place will be complete. For occupancy, the building inspectors require all safety features in place (e.g. guardrails, stair hand rails, insulating foam to be covered by drywall or other wood materials that will delay the spread of a fire to this material sufficiently to allow escape) plus a functioning kitchen, bathroom, bedroom and basic living area. With that in mind much of my current effort is to get the daylight walkout basement (essentially the ground floor when looking at the front of the house) sufficiently completed in order to provide a reasonably finished and comfortable living and sleeping accommodation, and on the main floor get the kitchen area completed. In the loft, other than fitting tongue and groove to the ceiling of the master bedroom in order to cover the insulation in the conventional framed roof that was sprayed from below (see "Purple Rain" dated 24 September 2017), as this exposed spray foam would not be accepted at the occupancy inspection for reasons of fire safety, my intention is to complete the rest of the loft bedroom and bathroom suite after moving in. I am aiming for occupancy third week of July. We will see!
My last update showed the installation of my 5 foot wide and heavy timbers stairs. Bob Damstrom was back on site a couple of weeks later to install the stair guardrails that you can see on the right of the following photos, and a handrail on the left, plus the guardrails to the loft gallery, and the small loft bedroom deck. These are all safety features that have to be in place for occupancy. Here's a quick tour up the stairs (protective cardboard remaining in place until much of the work inside is complete).
First, looking from the entrance lobby at the first flight to the half landing.

Then looking back down from the half landing to the lobby.

Then the next half flight to the main floor (the trim timber you see behind the hand rail will be stained later).


Here, from the top landing looking back down.


As you can see in the next photos, the layout provides plenty of wall countertop space, a big cooking island and an additional three person breakfast bar. I'll give you a quick tour.
First, on the North East wall adjacent to the pantry in the corner is where the kitchen sink will be fitted, plus a tall cabinet for my double oven.


- First, while the waist height cabinets are constructed with the supporting base plinth being integral with the back and sides of the cabinets, in the case of the two tall units, these were not integral and had to be constructed on site using materials they supplied. That material was OSB and not the plywood I had paid for, and as can be seen in the first two photos above, clearly leaves a mismatch at the base on the side below the finished oak veneer that is a complete eyesore.
- Second, the various finishing side panels and the big panel in the last photo that will go on the back of the breakfast bar, have to be cut to size on site. Not, it would seem, a problem, except that in many cases this will leave an exposed unfinished plywood edge.
That all said I now know I shall be receiving these items week after next. In terms of further finishing of the kitchen, I am expecting delivery of my larder fridge, gas cook top, double oven, microwave and dishwasher in the next two weeks, and so, along with the aforementioned items to correct the cabinet deficiencies, I should be able to complete the kitchen cabinet installation by the time I do my next update. As for counter tops, I made a decision and last week ordered my wooden counter tops from RBM Lumber in Columbia Falls, Montana - the same company that made my front door. I had considered granite, but the cost is six times greater, and in an attempt to stay within my overall budget, granite was outside my resources. Having visited RBM Lumber two weeks ago to look at how they make and lacquer finish countertops to provide protection, I am confident that they will deal with any food or liquid splashes, but I will need some metal or stone griddles around my gas cook top for placing any hot pots and pans on. While a compromise, I think the wood option will look good and be in keeping with the post and beam and other timber features of the house.
I ordered my cedar fronted garage doors way back last summer, but these have sat in Duffy's Doors workshop since September, with Mike and Jody Duffy being very patient while I deal with the various stalls in building. The week before last I spent time in their workshop staining both sets of doors - again doing his myself to keep within my budget. In the following photos you will see one set stacked to dry, and the other set on trestles immediately after staining.


I also took delivery a week ago of my various bathroom vanities and the basement family room wet bar, and again some of these have been fitted, as ever with some help from Chris Walch. Another quick tour ...
This is the vanity in the basement shower bathroom, fitted and secured to the wall and awaiting my decision on sink, faucets and counter top.


I have also fitted the vanity in the half bathroom on the main floor next to the laundry. Apologies that the doors are off, but this is work in progress while I build a small tiled counter top surround on the base of double plywood you can see that I have fitted on top ...

... to then fit the wide and deep metal sink shown below so that this half bathroom can be used as the laundry soaking sink as well as a hand washing basin for those using that bathroom.

While I said earlier that much of the finishing work in the loft master suite will be undertaken later in the year after I have moved in and am temporarily living downstairs, I have fitted the double vanity shown below. I have ordered a wooden counter top for this, along with those in the kitchen, but have yet to decide on sinks and faucets.

As for the basement wet bar, I can't show you the start on fitting that as I have forgotten to take photographs. Next time.
Those looking closely will have perhaps noted some tiling. This has been the really big piece of work over the last few weeks. Chris has helped me with the small amount of tiling on the main floor in the laundry/powder room (loo or cloakroom to UK readers) ...


First, the en suite shower bathroom to one of the downstairs bedrooms.


So, some frustration while running back and forth in ever decreasing circles with certain suppliers and having to firmly stand my ground. Time wasted, but really I am not surprised, as in 12+ years of living in Canada I have found that most people just will not argue their case and then get walked over. My rather more blunt attitude when dissatisfied comes as something of a shock, especially when I will not let them work on the assumption that if they ignore the customers demands the problem will go away. Unlucky - it doesn't! Just as certain contractors have found out in the last year if trying to get away with things on site.
But overall, while working perhaps just a little intensely at present, and so feeling somewhat "knackered" at times, the overall satisfaction is that the build is now maturing into a real home. Much work still to do, both to be able to get my approval to move in this late July, and then finish it off inside thereafter (let alone landscaping a garden next year) but I remain enthusiastic about the end result. Soon I will be able to sit on one of my decks with a glass of wine and enjoy those stunning views. There is much work planned in outline for the next few weeks in order to achieve the goal, including my electrician and plumber coming in so that we can get their area of work finished on two of the three floors to make the house habitable, but I am not going to predict how much will be achieved, however tempting. Until my next progress report.
Love the British bulldog bullishness mate! Take no prisoners I say! I also love the slate tile look, we had it in our place in Sydney, although apparently it was very dated, all the fashion in the 70s, but it was a novelty to us Poms. I’m sure in the back country where you are homesteading it will be in fashion for a while yet! Mind you I reckon it will be chilly on the old feet in the winter, I’ll send you a pair of ugg boots for Xmas. Talking of chilly, do your doors open directly to the elements in the main living areas? It looks like you could do with an airlock for those winter day openings if they do! Hopefully your next update will be tapped out on you PC in situ. I’ll send you an email IDC.
ReplyDelete