"Blood, toil, tears, and sweat."
Well, it is now five weeks since my last post and if any phrase springs to mind about recent frustrations in terms of house building in general, the inevitable build-up of delays, and the exacerbating effect of an early onset of winter on those same delays, it is Winston Churchill’s "I have nothing to offer but blood, toil, tears, and sweat."
My tears were nearly shed last Sunday, when after many hours of writing a post and then uploading a number of photographs via an abysmally slow internet system, I then tried to sort out a formatting alignment issue, at which stage the whole draft completely disappeared into the ether. I had a totally blank document, and nothing I did for the next hour could retrieve it. A response next day to my email to the blogger site explained that unless I had actually published the post, there is no means of recovery. Hence, with work on site keeping me rather busy, my rewrite had to wait another week, and from now on, as per the advice of two friends, one who emailed out of concern asking why nothing recently published, I will henceforth draft first in a Microsoft Word document and then paste that into the blogger site with my photos.
As said, the “blood, toil, tears and sweat” has been magnified by an initial early snowfall at the start of November. Working in snow and the cold is demanding and reduces work rate significantly. But the snow also totally inhibits any heavy delivery truck being able to climb up my rather steep drive. As readers know, the build is already 2½ months behind where the initial projections of my main two contractors had suggested it would be, with various explanations in earlier posts (over ambitious timeline projections, one of those contractors worker bees habitually deciding not to turn up for work one or two days each week, and one contractor, who had already made a mistake on my deck design, then diverting his focus to another client for the best part of six weeks, leaving me waiting). The reality is when the snow returns, access for heavy trucks bringing in building supplies may prove impossible up my steep driveway. Already behind by 2½ months, the snowball effect of winter (pun intended) is I may have to shut down the build for 3-4 months.
Matters were made worse by an awful accident to one of the plumbing and heating contracting team this last week. He had a ladder from the main to the loft floor slide from under him, leading to him falling 10’-12’. Somewhat isolated out here, as 48km from the nearest hospital in Cranbrook, we got him there eventually by ambulance. Subsequent diagnosis has shown that he has two fractured vertebrae. I am to say the least very upset for him. He is in a lot of pain, will be off work for 6 to 12 weeks, and I suspect will later in life suffer possible arthritic pain from that damage. Throughout the build I have inevitably been very concerned about the risks of an accident, particularly in terms of somebody falling during the various stages of construction of my roof, and have frequently voiced my concerns to contractors to ensure they took responsibility for their safety. I thought by now we were through the most risky stages. How wrong I was.
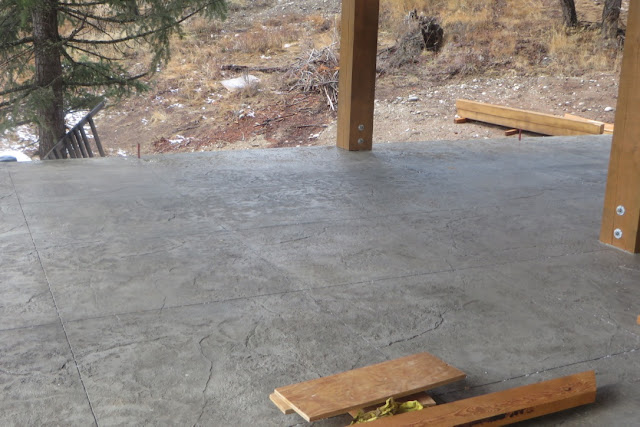
Moving forward. Readers of my last post will recall that I had been fitting the waterproofing membrane and laying the reinforcing rebar to my over garage deck, followed by Napoleon Champagne’s team from Crowsnest Concrete pouring a 2” thick layer of concrete and then doing a slate skin stamp. The day after my last post (Sunday 22nd October) Nap and one of his team came back to both cut a 4’x4’ tile pattern and then stain it in my chosen colour of a slate grey with the odd “hint” of mocha. Below is the result. Spectacular!

Readers may recall the issue of where it became apparent last August (post titled “Problems and Solutions: 13th August 2017) that the concrete sono’s or piers for the cross walk above my front door entrance and between the main front deck area and the concrete over garage deck, had been incorrectly planned for position, and so the deck guard rails and deck edge would not have been protected from a roof snow slide. There were inevitable delays in trying to repeat the line up of trades to excavate the incorrect sono’s, fit and back fill new ones, bring in concrete, and then getting Bob Damstrom to do his reconstruction, all while aiming to do this at the least additional cost overrun. As explained in the 13th August post, I took the pragmatic “no-blame” and “let’s find a way forward” approach. But the main delay was purely that Bob Damstrom switched focus from me to another client in Saskatchewan (who signed some months after me – so to say I slightly resented but tolerated this is a polite understatement). The simple fact is, had the mistake not been made, this deck could have been completed in the summer.
With Bob back in BC early October, his rebuild of the deck posts and joists in the cross walk area was then undertaken (see last post dated 22nd October) and then it became my role in our contract to take delivery of the timbers for the deck tread or runners, stain and then fit them. Time pressure was now on me, both as the weather forecast was indicating an early snowstorm, and because I had agreed with Dwight I would have the front deck in place so he had an area he could then work from to do his work siding the walls above. Also because my landlord/friend and building mentor, Chris Walch, who I had asked to assist me with this task, was due an op for carpal tunnel syndrome, after which he would be out of action for a while in terms of such manual work.
So, I picked up the timbers, a 4’ high stack, from Bob’s yard on my trailer late one afternoon (the charitable side of me had agreed to transport them as he doesn’t have a trailer big enough, normally courting such favours from a friend of his) and ended up unloading them in the dark.


My tears were nearly shed last Sunday, when after many hours of writing a post and then uploading a number of photographs via an abysmally slow internet system, I then tried to sort out a formatting alignment issue, at which stage the whole draft completely disappeared into the ether. I had a totally blank document, and nothing I did for the next hour could retrieve it. A response next day to my email to the blogger site explained that unless I had actually published the post, there is no means of recovery. Hence, with work on site keeping me rather busy, my rewrite had to wait another week, and from now on, as per the advice of two friends, one who emailed out of concern asking why nothing recently published, I will henceforth draft first in a Microsoft Word document and then paste that into the blogger site with my photos.
As said, the “blood, toil, tears and sweat” has been magnified by an initial early snowfall at the start of November. Working in snow and the cold is demanding and reduces work rate significantly. But the snow also totally inhibits any heavy delivery truck being able to climb up my rather steep drive. As readers know, the build is already 2½ months behind where the initial projections of my main two contractors had suggested it would be, with various explanations in earlier posts (over ambitious timeline projections, one of those contractors worker bees habitually deciding not to turn up for work one or two days each week, and one contractor, who had already made a mistake on my deck design, then diverting his focus to another client for the best part of six weeks, leaving me waiting). The reality is when the snow returns, access for heavy trucks bringing in building supplies may prove impossible up my steep driveway. Already behind by 2½ months, the snowball effect of winter (pun intended) is I may have to shut down the build for 3-4 months.
Matters were made worse by an awful accident to one of the plumbing and heating contracting team this last week. He had a ladder from the main to the loft floor slide from under him, leading to him falling 10’-12’. Somewhat isolated out here, as 48km from the nearest hospital in Cranbrook, we got him there eventually by ambulance. Subsequent diagnosis has shown that he has two fractured vertebrae. I am to say the least very upset for him. He is in a lot of pain, will be off work for 6 to 12 weeks, and I suspect will later in life suffer possible arthritic pain from that damage. Throughout the build I have inevitably been very concerned about the risks of an accident, particularly in terms of somebody falling during the various stages of construction of my roof, and have frequently voiced my concerns to contractors to ensure they took responsibility for their safety. I thought by now we were through the most risky stages. How wrong I was.
Moving forward. Readers of my last post will recall that I had been fitting the waterproofing membrane and laying the reinforcing rebar to my over garage deck, followed by Napoleon Champagne’s team from Crowsnest Concrete pouring a 2” thick layer of concrete and then doing a slate skin stamp. The day after my last post (Sunday 22nd October) Nap and one of his team came back to both cut a 4’x4’ tile pattern and then stain it in my chosen colour of a slate grey with the odd “hint” of mocha. Below is the result. Spectacular!


I’d mentioned in my last post that I’d just contracted with Dwight Hulbert Construction to undertake the task of the external finishing work in terms of cedar siding, window, corner and roof fascia trims, roof ventilation pucks, aesthetic finishing of the rear loft shed dormer and front porch dormer (above the deck cross-walk and front entrance), plus all associated window, door and trim rain drip flashings. Quite a mammoth task and one that I would expect to take 6-7 weeks in total for him and his one assistant. I’ll talk more on his work in a while, but first the wooden decks at the front of the house.
Readers may recall the issue of where it became apparent last August (post titled “Problems and Solutions: 13th August 2017) that the concrete sono’s or piers for the cross walk above my front door entrance and between the main front deck area and the concrete over garage deck, had been incorrectly planned for position, and so the deck guard rails and deck edge would not have been protected from a roof snow slide. There were inevitable delays in trying to repeat the line up of trades to excavate the incorrect sono’s, fit and back fill new ones, bring in concrete, and then getting Bob Damstrom to do his reconstruction, all while aiming to do this at the least additional cost overrun. As explained in the 13th August post, I took the pragmatic “no-blame” and “let’s find a way forward” approach. But the main delay was purely that Bob Damstrom switched focus from me to another client in Saskatchewan (who signed some months after me – so to say I slightly resented but tolerated this is a polite understatement). The simple fact is, had the mistake not been made, this deck could have been completed in the summer.
With Bob back in BC early October, his rebuild of the deck posts and joists in the cross walk area was then undertaken (see last post dated 22nd October) and then it became my role in our contract to take delivery of the timbers for the deck tread or runners, stain and then fit them. Time pressure was now on me, both as the weather forecast was indicating an early snowstorm, and because I had agreed with Dwight I would have the front deck in place so he had an area he could then work from to do his work siding the walls above. Also because my landlord/friend and building mentor, Chris Walch, who I had asked to assist me with this task, was due an op for carpal tunnel syndrome, after which he would be out of action for a while in terms of such manual work.
So, I picked up the timbers, a 4’ high stack, from Bob’s yard on my trailer late one afternoon (the charitable side of me had agreed to transport them as he doesn’t have a trailer big enough, normally courting such favours from a friend of his) and ended up unloading them in the dark.


Next day it became clear the timbers were not brush sanded as per contract and often badly water marked. Under any other circumstances I would have returned the lot but for the fact was I needed to get this deck built within days for reasons just said. It took three days work on my part and Chris’s to sand the deck timbers to an acceptable level and get rid of the water staining, prior to my then staining them in an oil based natural clear stain. Chris and I then spent the weekend of 4th – 5th November from first light to dusk building the deck in snow and sub zero conditions.


My ire increased as it became clear as we worked that the timbers were of varying width and thicknesses and not milled as per local trade norm to be within 2/16” tolerance, leading to inordinate work trying to match timbers for width and thickness. Through all my annoyance and shivering cold over those two days, the only thing that kept me calm was the occasional glance at these views shown below. Something to look forward to and appreciate when the build is complete and I come to forget the hurdles endured on the way. What is there not to like about this place?


Inevitably there was a meeting “without coffee” where I expressed my dissatisfaction and made it quite clear that my final payment will be reduced to account for the work that Chris and I had to do to make good the brush sanding, and that payment will only be made when the occasional deficiencies that still remain apparent to the eye for width and thickness are corrected by Bob. Suffice to say, we have kept matters on an even keel, and are moving forward in a rather more conciliatory manner, and he has now delivered to me a fresh cut and properly sanded set of timbers for the deck treads that will make up my small 4’ x 32’ loft rear bedroom deck.
The following are views of the competed work on the front timber deck (the camera doesn’t reveal the aforementioned occasional errors in width and thickness). Overall it’s quite impressive.
The following are views of the competed work on the front timber deck (the camera doesn’t reveal the aforementioned occasional errors in width and thickness). Overall it’s quite impressive.


Bob is also now in the process of building the guardrails that will go round the perimeter of the wooden and concrete decks, and subject to snow not allowing him to get those up my steep drive, I hope these will be fitted in the next few weeks.
One of those photos above gave a glimpse of Dwight’s work on my cedar siding, so now I will talk through his work. His first week dealt with perhaps the slowest and hardest part of the building in terms of access and finicky cutting of siding in order to fit the angles between the shed dormer walls and the roof slope. In the following photo you can see the shed dormer, previously just a wood frame, is now completed, with the underside of the roof being trimmed in a white clear-coated pine, and then cedar siding on the external walls. Not shown, but behind that siding Dwight had initially wrapped this wood framed part of the building with a waterproof house wrap as per building code (not needed for the main ICF walls). You can also see the two level fascia board trims that fit under the lip of the metal roof, plus the window and corner trims using panel strips of cedar.
One of those photos above gave a glimpse of Dwight’s work on my cedar siding, so now I will talk through his work. His first week dealt with perhaps the slowest and hardest part of the building in terms of access and finicky cutting of siding in order to fit the angles between the shed dormer walls and the roof slope. In the following photo you can see the shed dormer, previously just a wood frame, is now completed, with the underside of the roof being trimmed in a white clear-coated pine, and then cedar siding on the external walls. Not shown, but behind that siding Dwight had initially wrapped this wood framed part of the building with a waterproof house wrap as per building code (not needed for the main ICF walls). You can also see the two level fascia board trims that fit under the lip of the metal roof, plus the window and corner trims using panel strips of cedar.

In the next photo, you’ll see a fitted fir bellyband mid height that extends from the front deck structural beam. This bellyband is purely cosmetic, providing an extra break to the eye in addition to the big structural rafter carrier beam that sits higher up astride the concrete wall. You’ll also note a lot of vertical strips of plywood. This is strapping the building for rain screen prior to fitting the siding to that strapping, so that if any rain ever gets through the siding there is a capillary space big enough to allow water to drain down and away through the drip edge flashing and bug screen that you might just be able to pick out lower down on the bottom of the wall. Dwight’s pride in his work and attention to detail has continued to impress me, not least his fastidiousness in terms of sealing at all corner and window trim joints where they tie in with the cedar T&G siding. This sealing ensures, in addition to the bug screen at the bottom, that bugs have no means of getting behind the siding – as if they do it will attract woodpeckers. The exposed ICF space you see below the flashing is where I have to do a little more profiling of the land next to the house next spring, prior to rock masonry work.

In my search for a local contractor to undertake the siding job, I had found many argued against a rain screen. Simply put, its more work and expense, and under the BC building code not currently required in the relatively dry interior, unlike on the wetter west coast, so reality is most don’t know how to do it. But from the start I had said I intended to have a rain screen, as I consider it best practise, prudent mitigation, especially if the wet summer of 2016 becomes a norm with climate change, and in any case I know for a fact the updated BC Building Code to be issued next year will require it throughout BC. So those nonbelievers are just going to have to get used to change and doing things the new way! In negotiating with Dwight he had actually proposed a rain screen without my prompt.
Some weeks on since he started, here is a quick walk round the building to show you the rather significant visual changes to the exterior.
At the back of the house, work is now completed below bedroom deck level, except I have to build a pressure treated well window for that tiny basement bathroom window you might be able to pick out, and then he can tie in the window trim in that area. Above my bedroom deck, Dwight is saving work there for a rainy day!

In the next photo we are looking under the covered over garage deck. He has fitted the siding roughly half way up now and again is saving the rest for a rainy day. The intention is to fit a false beam astride the ICF wall where the bottom of the wood framed gable joins that wall, and this will aesthetically tie in with the big rafter carrier beams that support that open roof. This will also provide a visual break to what would otherwise be an over powering expanse of siding on that wall.

In the next photo you can see the northeast wall is now finished, except for the land profiling and rock masonry work for next year that I mentioned earlier.

And in the photo below is the present view of the front southeast wall. The area below the deck is now finished and trimmed down to the flashing that is sited to be just above my future concrete patio. Dwight also started initial work on trim pieces on the above prow wall last Friday when I took this photo. Work on the prow wall will be intricate and time consuming to work around those windows and the central fir column, plus having to erect high scaffolding in order to fit the double fascia boards under the edge of the metal roof (the pieces of lumber you see there at present were put in place by the metal roofer to get the spacing correct for this subsequent finished facia). But I anticipate his biggest job on this wall will be the finishing of the porch dormer. Intention is to use pine T&G on its underside in order to match the underside of the rest of the roof, and cedar shingles in the timber truss at its front.

For the rest of the front wall at the front door and around the garage doors, Dwight will fit a band of fir along the top edge under the concrete deck, and next spring I will have that entire wall finished by another contractor in a stone masonry veneer.
While a significant amount of my time this last five weeks has been spent either working on the front deck, or bringing in various materials and progressively staining them for Dwight, there has been other work going on too. Readers may have noted in one of the last photos I now have a front door, which was finally ready for my pick up from RBM Lumber in Montana, Friday 17th November. Readers may recall from my last post that I had received a phone call explaining they had started to stain the original door in the wrong stain – and hence had to make a second one. Despite the delay, I am very pleased with its quality, colour, solidness and the wire brushed finish, all at 25-30% of the cost of what a similar quality of door could have been supplied by from a local Fernie provider of bespoke doors. The Fernie factor that relies on an influx of Alberta oil rich customers building their ski lodges!


Within that lock up or weather tight descriptor, I have also progressively been working round the building spray foam sealing the narrow gaps left between each window or door frame and the walls. My first attempt proved extremely messy, not least because I did not wear gloves. It was over a week before I could get all the wretched yellow stuff off my hands. Lesson learnt!!!!


The plumbers’ team, aware of the likely delays to their other work on this build, have also focussed on finishing off various ducting for fans venting to outside and the heat recovery ventilation (HRV) system. It was during this work last Thursday that one of the team had his dreadful fall and evacuation to hospital mentioned at the start of this post.
Moving on from that distressing tale, I shall close off this post in anticipation of tomorrow’s main floor concrete pour. Thereafter, while I’d like to get my dry wall contractor in, I suspect the inbound snow and my steep drive will mean delivery of the huge amount of drywall materials will be kyboshed and have to wait a few months. Nevertheless, I intend to keep pushing on over the next few weeks for as long as I can, and once the snow falls will take stock and decide whether I can continue with certain smaller tasks, or whether I just shut the build down for the winter and take a much needed break. Standby for the next post in a few weeks time, and in the meantime, I'll leave you with that current view of the front of the house as I really think that gives a feel for the original vision during the design phase. Tallly-ho!

While a significant amount of my time this last five weeks has been spent either working on the front deck, or bringing in various materials and progressively staining them for Dwight, there has been other work going on too. Readers may have noted in one of the last photos I now have a front door, which was finally ready for my pick up from RBM Lumber in Montana, Friday 17th November. Readers may recall from my last post that I had received a phone call explaining they had started to stain the original door in the wrong stain – and hence had to make a second one. Despite the delay, I am very pleased with its quality, colour, solidness and the wire brushed finish, all at 25-30% of the cost of what a similar quality of door could have been supplied by from a local Fernie provider of bespoke doors. The Fernie factor that relies on an influx of Alberta oil rich customers building their ski lodges!


Jason Olesen returned last weekend to complete his contract commitment to me by fitting my front door, plus the door between the lobby and the garage as shown here …

… and a steel plain white door between the garage and the mechanical room (not shown as is really rather dull and functional). The house is now officially at lock up.
Within that lock up or weather tight descriptor, I have also progressively been working round the building spray foam sealing the narrow gaps left between each window or door frame and the walls. My first attempt proved extremely messy, not least because I did not wear gloves. It was over a week before I could get all the wretched yellow stuff off my hands. Lesson learnt!!!!

At a much later date the interior of these windows will be stained and trimmed out in wood post dry walling. At this stage the urgency is just to seal them for reasons of insulation before applying heat to the building.
The next progress advance in the building was the installation of my gas fireplace in the family room in the daylight walk out basement. Chris and I built the frame ready for its arrival. (I have yet to decide on how I will finish that frame, be it wood, drywall or a stone veneer, but such decisions are not a priority today).
The next progress advance in the building was the installation of my gas fireplace in the family room in the daylight walk out basement. Chris and I built the frame ready for its arrival. (I have yet to decide on how I will finish that frame, be it wood, drywall or a stone veneer, but such decisions are not a priority today).

Prior to installation the fireplace required a 10” exhaust vent and air intake to be bored through the concrete wall for the exhaust and air intake flue ...

… and here are the remains of the removed core of concrete and insulating foam …

and the subsequent cowling and finished siding.

Another saga was having to take delivery of my kitchen units. Based on the projected timescale at the time, I ordered these over 4½ months ago for delivery mid October. Timescales slipped! I then paid a month of storage charges to the Calgary based supplier at $100 a week. Now facing the likelihood that once the winter snow falls and stays on my steep drive I may be forced to shut the build down for a few months, and even if I could continue over the winter, the kitchen units would just be in the way of other work, I decided to have them delivered to storage at the depot in Cranbrook where I have been storing all my furniture since the move over from Ottawa end of June 2016. At a quarter of the storage price of leaving it with the kitchen supplier this was the only sensible option.
I’ve mentioned winter and snow quite a few times, and as you can see from earlier photos, we had a couple of weeks of it early November. I am told that typically this area of BC gets an early November teaser and then it melts away until coming back to stay mid December. However, the initial view this year was that the early November snowfall was here to stay as it was the dry powdery type that comes later rather than the initial wet early fall type, so and I went into a bit of a panic mode. The slope profile of my plot of land is such that the steep driveway will always be a challenge in winter, probably only suitable for a 4x4 going up or down in 4 low ratio. Indeed, once in the house, my intention was always to have a mini snow plow on the front of an ATV so I could clear my way out from above. While the outlook at build start by my main two contractors was that I might achieve occupancy by end of September, I had always realistically had in the back of my mind it would be December. But we are still at least 3 months off being ready to seek occupancy approval from the local planning authority. Major milestones to get through are a 2” concrete pour on my main floor (which readers may recall is engineered for this as a part of the in-floor hydronic radiant heating system), dry walling (itself a mammoth task and must be done to provide a fire barrier to the Insulated Concrete Forms internal foam insulation before I could be allowed to live in the house), commissioning the heating system, finalising plumbing and electrical systems, and having a minimum of two bathrooms and a cooking area, plus the timber stairs and associated guardrails/bannisters. Much to do. The early snow, despite initial forecast, did indeed melt away, I came off panic mode, and a week ago identified a narrow window for getting a concrete and pump truck up the drive for the main floor concrete pour before the snow comes back.
So, last week I spent the best part of two days clearing the main floor of all the materials that have been stored up there, then covering it with a polythene layer to protect the sub floor from the initially wet concrete. My plumbing and heating contractor, aware that I am facing a dilemma of possibly having to shut the build down over the next 3-4 months winter, have focussed this last week on plumbing in my boiler ready to fire it up next week so I can if necessary leave the building with background heat that is both safer than electric fan heaters and cheaper to run (using the 1000 gallons of propane in my tank). The mechanical room is beginning to remind me of a neat warships engine room …


… and as of last Friday the open plan main floor (great room, kitchen and diner) is now fitted with the hydronic heat loops, shortly to be covered in 2" of concrete.


I am now ready for the concrete pour that is booked for 1000 tomorrow (Monday 27th November). I have agreed with all three contractors (Nap, concrete supplier and line pump truck) an 0830 “go/no go” phone call from me in case the snow has come back. As I type, the current outlook is for a “go”.
The plumbers’ team, aware of the likely delays to their other work on this build, have also focussed on finishing off various ducting for fans venting to outside and the heat recovery ventilation (HRV) system. It was during this work last Thursday that one of the team had his dreadful fall and evacuation to hospital mentioned at the start of this post.
Moving on from that distressing tale, I shall close off this post in anticipation of tomorrow’s main floor concrete pour. Thereafter, while I’d like to get my dry wall contractor in, I suspect the inbound snow and my steep drive will mean delivery of the huge amount of drywall materials will be kyboshed and have to wait a few months. Nevertheless, I intend to keep pushing on over the next few weeks for as long as I can, and once the snow falls will take stock and decide whether I can continue with certain smaller tasks, or whether I just shut the build down for the winter and take a much needed break. Standby for the next post in a few weeks time, and in the meantime, I'll leave you with that current view of the front of the house as I really think that gives a feel for the original vision during the design phase. Tallly-ho!

Very nice indeed oppo. A great shame you’ve had all the frustrating delays and won’t enjoy the cabin fever this winter 😎
ReplyDeleteThis comment has been removed by the author.
DeleteChances are I will still suffer from cabin fever living in the over garage apartment down at Chris's log cabin. Might just have to travel to get some sun.
DeleteNice plumbing! Liberal use of isolating valves is good engineering practice. I would be inclined to put a support bracket under the expansion tank though! BTW, does the code require fire suppression sprinklers?
ReplyDeleteAha, so you do read things that are not just on Facebook. :-)
DeleteI do rather appreciate the mechanical engineers opinion of my mechanical room, even if a little bit "Jack".
And no code requirement for fire suppression sprinklers.
Clanky approved! You'll need someone with a full AMC to operate it all though!
DeleteYou do remain so very Jack! But glad you approve. As for the AMC, you forget, my having done a brief period as a submariner (dreadful year) where I had to trace every system in the boat for my Part 3, then as an MCDO where I was the user maintainer of my dive kit (safety to my life), then 3 years at DRDC where my work focus was equipment development, trials and evaluation (TD&E), I have a pretty good systems understanding for a non clanky. My plumber has been a bit surprised by my ability to trace the systems and barrage of ongoing questions. Clearly he is not used to this from 99% of his clients!
Delete