Summer is over and winter is approaching much too fast.
Well, it's been four weeks since my last update on 24th September, and my excuse is I have been ridiculously busy with the build, working straight through two weekends without a break. The structure of the building is now essentially complete and almost to lock-up (or weather tight), and much of my focus has been on the transition from my initial main two contractors (Jason Olesen and Bob Damstrom) who were the key players amongst five who got me here, to those others that will now turn the house both into a functioning building (plumbing, gas, heating and electricity) and an eventual turnkey finish. This shift in focus has involved running around dealing with those contractors I had signed with earlier this year for the plumbing, gas, heating and electricity, while engaging other contractors and suppliers to achieve various parts of the finishing. I don't seem to have stopped in four weeks, and much of the planning ahead has become a 24 hours 7 day a week constant thinking process.
When I published my last update, Casey's had two more days work to complete the metal roof and clear up their trash from my site. All achieved, and I have to admit, despite the fully expected $28,000 bill, I am overall very pleased with the resulting metal roof.

 Two things may strike the more regular readers. The clear evidence from the initial photo above that the cross deck walkway from the front deck to the over garage deck is also now rebuilt, and windows and doors. The regular readers will recall the saga where the concrete sonos that support the deck posts for the cross deck walkway had been put in the wrong position (a design drawing mistake) and so had to be removed and replaced. With the sonos re-sited a few weeks ago (last post) Bob Damstrom returned from another build contract he has in Saskatchewan (building a party barn for a well to do grain farmer) and came and rebuilt the deck cross walkway above my front entrance.
 I have since managed to stain the main posts and cross beam members that are more exposed to the declining weather, and hope to complete staining all the joists (not evident in the photo above but are just about in the first photo) over the next week. My task after that is to stain and then fit all the deck treads - time is the critical commodity at the moment as I am stretched coordinating other parts of the build. Bob is meanwhile building the guardrails and will be fitting these once I have fitted the deck treads.
Jason Olesen's team have also fitted my doors and windows, with the exception of the main front door (more on that in a moment) and the two internal doors between the garage and the mechanical room at the back, and the garage and entrance lobby at the front. Both of those are outside the contract I engaged Jason on, but I shall probably ask him or another contractor to fit those in the next few weeks. Then, once the front door is installed, even without garage external doors, the house will be at lock up/weather tight.
The front door has provided a bit of a hiccough in proceedings. It is a custom design using a mix of fir and larch, wire brushed for effect, and slightly over-sized (7'6" high x 3'6" wide) and is being made by RBM Lumber down in Columbia Falls, Montana. The door itself was complete a couple of months ago, but with the delays in the project, I had deferred picking it up. Between myself and RBM, we had also had a protracted engagement trying to achieve a stain to match the one I am using for my cedar siding, as despite the quality of the Messmers UV Plus product (http://www.messmers.com/messmers-uv-plus-deck-stain) they would not use it! After 3 weeks we eventually agreed a clear stain UV protected match and I gave approval to go ahead, stating I would like to pick up this last Friday. A day after I gave that go ahead, I received a slightly embarrassed phone message stating they had a problem with my door. On ringing, I could not but help laughing when it was explained that they had had a bit of an internal comms failure, resulting in the workshop using the initial stain colour chosen many months ago, not the one we had finally agreed on the day before. A very embarrassed "Don't worry Mr Woodward, we are already making you another new door." I hope to go down to pick it up later next week - possibly, maybe .......
Essentially the fitting of the doors and windows took Jason's team four days. Here you can see the mix of tar paper and peel and stick required as a waterproofing edging surround ...
 ... and then an installed window (these two are from my loft bathroom and loo).
 On the inside I will be spending some time over the next months spray foam sealing the edges to ensure no ingress of draughts (or bugs). Externally the windows will be framed by a cedar border surround at the same time as the cedar siding goes on the outside of the building (I'll talk more on that in a while). Much later, I will be staining the internal wood fir frames (they are black aluminium on the outside, wood inside) and fitting window shelf's and framed edging.
Jason's team also completed all the remaining internal stud wall framing. Other than waiting for the arrival of the front door, subject to my engineers review and the local authority inspection, Jason's work on my house is essentially done, although I may get him back to do some after framing work, such as dropped ceilings in the two basement bathrooms to allow for the overhead extraction fans, and framing of the gas fireplace surround in my daylight walkout basement family room, as well as fitting those aforementioned two garage to house internal doors. To show you the stud wall framing of the daylight walkout basement ...
... this photo is looking to the rear of the house from the family room, through the walls of one bedroom to the left of centre line, and beyond that the en suite bathroom and a closet (wardrobe) ...
 ... and a closer look at same from inside that bedroom ...
 ... and here we are looking from the family room at the bedroom to the right of centre line and its en suite ...
 In the main lobby you can see here the framing for the under stairs powder room or half bathroom (cloakroom to UK readers). You can see beyond a half landing and the mechanical room. The stairs themselves, a heavy timber structure being built by Bob Damstrom, will be installed much later, once dry walling has been completed.
 Here in the lobby either side of the main entrance, two small closets.
 Those of you taking a closer look at the above framing will have noted another big change. Masses of spaghetti like wiring and plumbing. Both my plumber and electrician have been hard at work roughing in their systems. My plumber is responsible for plumbing, in floor heating (some readers will recall the basement in-slab heating loop being installed (post dated 03 September "It Ain't Half Hot Mum") and the heat recovery ventilation (HRV) system required by building code here. The HRV is a system that in the winter months circulates air, expels a percentage, extracting its heat to then heat the sucked in fresh air. (In summer I would switch it off and open the windows!) While they have not been on site every day, both the plumbing and electrical teams have probably spent about 10 working days over this last month roughing in their systems. It has been a constant barrage of questions from both asking me where and how I want things sited. While distracting me from other work, their questions are always welcome as this ensures I get what I want, rather than in most houses a builder will second guess an owner he may never meet. I anticipate both the plumbing and electrical teams have about another 2 days work each to compete their roughing-in. My plumber will be back on site a few weeks later to lay the main floor hydronic heating loop before I have a 2" slab poured on that, and then I shouldn't see them again until such time as I have had a dry-waller do his work. In the meantime, a few pictures (please do feel welcome to ignore these if you have no interest in bits of wire and pipes).
The through floor wiring and gas line for my kitchen cooking island, ...
 ... and above that plenty of pot lighting. You'll note along the back wall all the electrical runs, plumbing and HRV supplies to the loft suite above. This unsightly mess will be hidden in a framed box section along the top of the back wall, which I may further disguise by making it look like a beam. You can also see the newly installed windows at the back of the kitchen and dining area, and the back door.
 Wiring for light and data controls in the partial wall between my Great Room and the office/landing area.
 Here in the stud wall between the Great Room and the stair well, one pipe is the supply from the HVR system. The other is my own innovation, a duct that will suck the excess of hot air that will accumulate from my wood burning stove high up in the vaulted cathedral ceiling and push it back down to the lower basement floor.
 In the next photo we are up in the loft suite, looking from the bed area into the bathroom framing, ...
 ... and the massive en-suite double shower.
 Amidst all this activity, I have tried to get on with building up and compacting the ground in front of the house for the walkout patio and main entrance area, ready for a concrete pour. The photos below are prior to the earlier photo of Bob Damstrom rebuilding the over deck cross walkway above the entrance.


Both too many tasks for one person to cope with and a rapidly approaching winter, has led me to a belated decision here. We are now regularly getting temperatures below zero at night, which is not ideal for curing concrete, so I have decided to delay the patio pour until next spring. Pressure on my time and cold conditions for curing concrete aside, it makes better sense to allow the ground in front of the house time to settle over the winter and spring thaw.
But conversely the over garage concrete deck had to be completed this side of winter for two reasons. First, in order to waterproof and protect the underlying joist structures from the risk of water damage over the next six months, as that is an expense I could not absorb, but also as the concrete pour on that deck needs to take place before my cedar siding is installed, otherwise the siding will be spattered by concrete. I'll talk about the plan for siding in a while, but first my concrete deck.
Weekend of 14-15th October was spent initially clearing all the building materials that had been sitting in this so far rather convenient storing and working area, and removing all the sawdust and other trash. Then on the Sunday, with an assistant, we first covered the deck in a waterproof roofing peel and stick membrane ...
 ... and then covered the peel and stick in 4'x5' tar impregnated Sopraboards which I had picked up from a Calgary supplier a week before. The latter are not so much an additional waterproofing membrane, but a thick protection for the peel and stick, as it evidence has shown that contraction and expansion of the concrete above can damage the peel and stick. Concrete, it should be noted can be porous, and certainly would be if it ever cracks, so even though my over garage deck has a roof above, waterproofing is absolutely key to protecting the underlying joist system.
 Sunday work with my assistant completed, I then worked on my own for 1½ days to tape down the seams of the Sopraboard ...
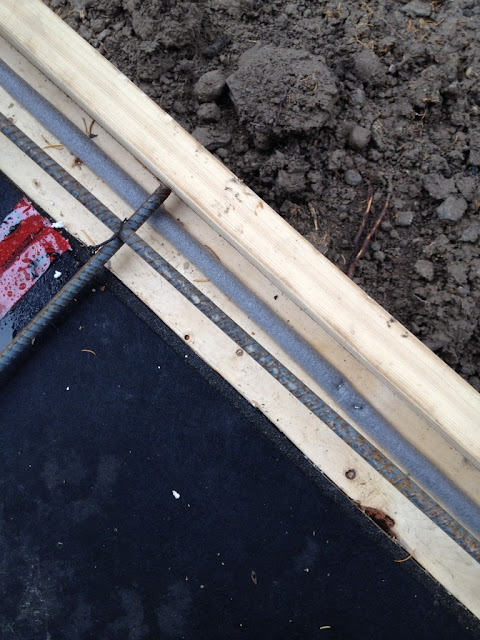
 and lay out and wire tie together a grid of 12mm rebar at 24" spacing. Having never done something like this before, but gleaned the how to by watching my contractors earlier work for the basement slabs, I must admit to be rather pleased with myself. (I have concluded there is nothing approaching rocket science in building, you just have to watch and learn). I even got told by my concrete contractor that he thought I had done rather a good job!
 The deck has temporary forms around its edge to contain the concrete pour and give a 2" overhang with an underlying drip edge. The foam strip you see below will produce a curved lip on the underside of the concrete overhang so that water will fall away rather than migrating along it and into the wood structures below.
 Thursday 19th October was pour day. I had engaged three contractors here, Salvador Concrete to deliver 5 CuMs of concrete, ...
 ... Dana Homeniuk of Jett Concrete Pumping (as the name is similar to Dano, who you made recall had an even bigger pump truck for my ICF pours, I have come to the conclusion all concrete pump driver owners must have similar sounding names) ...
 ... and Crowsnest Concrete http://www.crowsnestconcrete.ca/residential-concrete-gallery led by Napoleon Champagne. To those that start to say "you're taking the p..." I assure you his name is totally genuine. A little Googling showed me one such named had been a member of the Ontario Legislature and Mayor of Ottawa in both 1908 and 1924, so his name is not one made up by his parents. Nevertheless, a creative, colourful and slightly eccentric individual, while using the abbreviation of Nap, his full name suits him well. As an individual who has had to explain my Christian name for the last 55 years, who am I to suggest anybody has an unusual name.
Here we see the early part of the pour ....
 ... and here, near the end of the pour, at the other end of the deck.
 I had started at 0750 that day, doing some final prep work to protect my doors and posts with polythene. The pour was meant to start at midday but the concrete truck turned up nearly an hour late so we didn't start until 1PM. To the frustration of all, the concrete took an inordinate amount of time to cure, presumably as insufficient accelerators had been put in it to deal with the cold temperatures, and it wasn't until gone 7PM, in darkness and with rigged lighting that the team could finally deal with the stamping process to achieve my chosen stamped slate skin finish. A long day, we all departed site just before 10PM.

 Two days later, the photo below shows the stamped slate skin surface. Naps team are returning Monday (tomorrow) to cut a tile pattern into the concrete, then will apply a dark stain and seal it. Having based my plan on an example of such work Nap did in a Fernie Sushi restaurant (Yamagoya) a few years ago, I am anticipating quite an impressive finished result.
 The other area of work that has been keeping me inordinately busy is finding somebody to fit my cedar T&G siding plus a number of other external finishing trim work (e.g. finishing the underside of both dormers with pine T&G so that it matches the main roof underside, cedar shingles in the porch dormer, fitting ventilation pucks to the roof insulation framing soffits, fitting of fascia boards to trim the roof edge, building corners, and around windows and doors, etc etc). Finding somebody to undertake this work had initially proved fraught, especially when the candidate I thought was so keen then failed to give me anything in writing to substantiate his verbal phone message quote, and thereafter failed to answers my calls. (The cynic in me thinks this was related to my asking for something written, but also it appeared he had suddenly decided to go hunting, even though he had said he was available to meet at short notice)! I gave up on him and decided to turn to a local Wardner based builder (Dwight Hulbert) who I knew was nearing the end of another project and we went to contract.
In early preparation, I spent a few days staining the cedar siding with my loyal helper/mentor/landlord ...

 and a great deal more time working out and ordering the mass of other materials needed so that Dwight can undertake this work. He will be setting up on my site tomorrow (Monday 23rd) and I am anticipating his work will take 4-6 weeks (weather dependent) and require my being on site much of the time preparing a variety of materials for his use. A predominantly concrete build as opposed to my original plan for log walls, this siding and the heavy timber roof structure is what will still make the house look like a wood house, fitting for the rural mountain setting.
The other big headache at present is chasing three dry-wallers for quotes and dates they can start. All three seem to be busy, while also distracted by hunting season, and my feel at this stage is that while I could be ready inside the house for their work within 2-3 weeks, subject to inspections on the plumbing and electrical roughing-in and my subsequent sound proofing of certain internal walls and floors, there is likely to be a delay of 4-6 weeks before anybody can do this work.
Readers will have picked up my underlying concern is about winter coming and the need to get certain things done quickly. It's amazing that a month ago we were at the tail end of an extremely hot and unusually dry summer, even for this area, and the worst BC wild fire season on record. But in 4 weeks we went from being too hot even in shorts and T shirts, back to 4 layers of clothing first thing in the morning. And just masses of rain. Much needed but the dust bowl around my building site has now turned to a mud quagmire. While daytime temperatures have been in single figures, we are reasonably blessed this next week both by temperatures just creeping above 10, and little rain.

Well, in spite of my concern about getting a dry-waller onto my build in the next few weeks, I am anticipating some good work over the next 4-6 weeks externally that will continue to improve the aesthetics of this build.
Toodle Pip until next blog update. I'll aim to revert to 2-3 week intervals.
When I published my last update, Casey's had two more days work to complete the metal roof and clear up their trash from my site. All achieved, and I have to admit, despite the fully expected $28,000 bill, I am overall very pleased with the resulting metal roof.


Jason Olesen's team have also fitted my doors and windows, with the exception of the main front door (more on that in a moment) and the two internal doors between the garage and the mechanical room at the back, and the garage and entrance lobby at the front. Both of those are outside the contract I engaged Jason on, but I shall probably ask him or another contractor to fit those in the next few weeks. Then, once the front door is installed, even without garage external doors, the house will be at lock up/weather tight.
The front door has provided a bit of a hiccough in proceedings. It is a custom design using a mix of fir and larch, wire brushed for effect, and slightly over-sized (7'6" high x 3'6" wide) and is being made by RBM Lumber down in Columbia Falls, Montana. The door itself was complete a couple of months ago, but with the delays in the project, I had deferred picking it up. Between myself and RBM, we had also had a protracted engagement trying to achieve a stain to match the one I am using for my cedar siding, as despite the quality of the Messmers UV Plus product (http://www.messmers.com/messmers-uv-plus-deck-stain) they would not use it! After 3 weeks we eventually agreed a clear stain UV protected match and I gave approval to go ahead, stating I would like to pick up this last Friday. A day after I gave that go ahead, I received a slightly embarrassed phone message stating they had a problem with my door. On ringing, I could not but help laughing when it was explained that they had had a bit of an internal comms failure, resulting in the workshop using the initial stain colour chosen many months ago, not the one we had finally agreed on the day before. A very embarrassed "Don't worry Mr Woodward, we are already making you another new door." I hope to go down to pick it up later next week - possibly, maybe .......
Essentially the fitting of the doors and windows took Jason's team four days. Here you can see the mix of tar paper and peel and stick required as a waterproofing edging surround ...


Jason's team also completed all the remaining internal stud wall framing. Other than waiting for the arrival of the front door, subject to my engineers review and the local authority inspection, Jason's work on my house is essentially done, although I may get him back to do some after framing work, such as dropped ceilings in the two basement bathrooms to allow for the overhead extraction fans, and framing of the gas fireplace surround in my daylight walkout basement family room, as well as fitting those aforementioned two garage to house internal doors. To show you the stud wall framing of the daylight walkout basement ...
... this photo is looking to the rear of the house from the family room, through the walls of one bedroom to the left of centre line, and beyond that the en suite bathroom and a closet (wardrobe) ...


The through floor wiring and gas line for my kitchen cooking island, ...


Both too many tasks for one person to cope with and a rapidly approaching winter, has led me to a belated decision here. We are now regularly getting temperatures below zero at night, which is not ideal for curing concrete, so I have decided to delay the patio pour until next spring. Pressure on my time and cold conditions for curing concrete aside, it makes better sense to allow the ground in front of the house time to settle over the winter and spring thaw.
But conversely the over garage concrete deck had to be completed this side of winter for two reasons. First, in order to waterproof and protect the underlying joist structures from the risk of water damage over the next six months, as that is an expense I could not absorb, but also as the concrete pour on that deck needs to take place before my cedar siding is installed, otherwise the siding will be spattered by concrete. I'll talk about the plan for siding in a while, but first my concrete deck.
Weekend of 14-15th October was spent initially clearing all the building materials that had been sitting in this so far rather convenient storing and working area, and removing all the sawdust and other trash. Then on the Sunday, with an assistant, we first covered the deck in a waterproof roofing peel and stick membrane ...


Here we see the early part of the pour ....


In early preparation, I spent a few days staining the cedar siding with my loyal helper/mentor/landlord ...


The other big headache at present is chasing three dry-wallers for quotes and dates they can start. All three seem to be busy, while also distracted by hunting season, and my feel at this stage is that while I could be ready inside the house for their work within 2-3 weeks, subject to inspections on the plumbing and electrical roughing-in and my subsequent sound proofing of certain internal walls and floors, there is likely to be a delay of 4-6 weeks before anybody can do this work.
Readers will have picked up my underlying concern is about winter coming and the need to get certain things done quickly. It's amazing that a month ago we were at the tail end of an extremely hot and unusually dry summer, even for this area, and the worst BC wild fire season on record. But in 4 weeks we went from being too hot even in shorts and T shirts, back to 4 layers of clothing first thing in the morning. And just masses of rain. Much needed but the dust bowl around my building site has now turned to a mud quagmire. While daytime temperatures have been in single figures, we are reasonably blessed this next week both by temperatures just creeping above 10, and little rain.
Well, in spite of my concern about getting a dry-waller onto my build in the next few weeks, I am anticipating some good work over the next 4-6 weeks externally that will continue to improve the aesthetics of this build.
Toodle Pip until next blog update. I'll aim to revert to 2-3 week intervals.
It’s all looking grand shippers. BZ. Just finished 5 week’s of OST so I’ve been off grid and missed your last update. Aced it BTW, but not quite as intense as the ones I have done in the Andrew. I can now kick back and enjoy the next 18 months.
ReplyDeleteThanks for the compliments on the house matey. Grand, but far from liveable in yet. As of yesterday the horizontal T&G cedar siding started going up on the loft shed dormer, and that has certainly confirmed my vision and choice for how I wanted this house to look from the outside.
ReplyDeleteAs for your OST, I had a feeling you were on OST due to the silence, added to which OST's always seemed to naturally follow a change in the key Command players. I would expect nothing more than for you to ace it. BZ. Enjoy the next 18 months riding the wave.
I will. Best of luck winterising your house, watch out for the white walkers. If you haven’t already I would buy up the entires series of Games of Thrones and watch it during that long Candian winter. You will understand the expression “winter is coming” 😉
Delete