Problems and Solutions
Greetings and my apologies, as it is three weeks since my last post on the 23rd July, so I am a week late. While areas of the build have progressed well there have been some problems which have led to delay while these were discussed and thought through in order to reach solutions. Further, last week we lost two days, Monday due to the August statutory holiday, and Tuesday as Jason's team were off site pouring concrete for a large garage build he is undertaking for another client down at Sweetwater (further south on the lake near the US border). So for all these reasons I delayed my latest post. At the end of my last post I left my readers with this photo of all the post and beam system, timber roof and front deck structure in place.
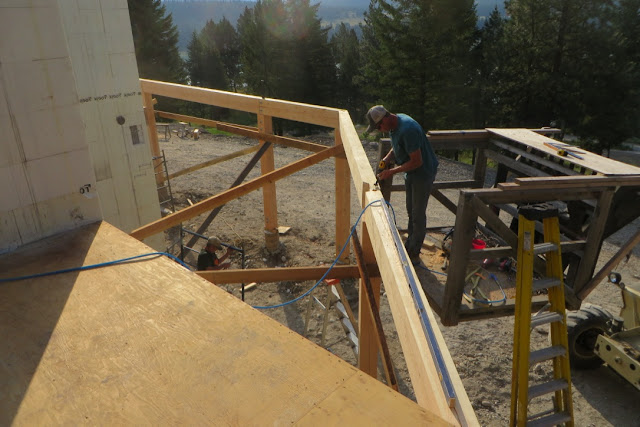
 Week of 24 July proved productive with nearly four days of Bob Damstrom's team fitting the Tongue and Groove (T&G) 2"x6"clear coat (varnished) pine roof decking over the timber roof rafters. Readers will recall I and my landlord, Chris Walch, spent much time staining and stacking this at the end of May (see post dated 4th June 17). Meanwhile Jason's team went off-site for much of this week so as not to be in the way and worked on the Sweetwater garage build for his other client. At the end of that week Jason's team returned to start work framing the three gables, the loft shed dormer and loft internal walls. I didn't actually take any photos while the T&G was being fitted, so these that follow were after the work and show some of the "in progress" gable and loft dormer wall framing as well.
In this photo we are looking up to the underside of the over garage deck roof. I am particularly pleased with the natural look this provides as there are three houses on the Koocanusa Ranch development with similar covered outdoor deck themes, but all use synthetic materials for their roof lining, in theory because they will last longer (I doubt it) and maybe because they cost less. There is no doubt in my mind this roof blends with the frontier mountain environment so much better.
 A closer look of the underside of the over garage deck roof. Awesome!
 This time looking towards the stair gable, where you can see the initial gable wall framing. You'll notice on the right behind the scaffold one of the two trapezoid window openings. The opposite side trapezoid is temporarily covered in sheathing board, which will be cut out later when the windows are fitted.
 Looking from the inside of the house in the stairwell area up at the same gable wall.
 And then looking 180 degrees the other way, up at the roof as it extends over the loft floor. The daylight gap is where the shed dormer is to be framed for my master bedroom (originally was to be the en-suite but I'll explain more on that swap round in a while).
 Below, looking up at the loft from the Great Room. In the background you can just pick out on the left the framing of the left hand gable wall and on the right side the start of work on the end wall of the shed dormer. In the foreground is the right hand master suite wall and door framing that will separate the suite from the gallery landing. (but no wall to the left at the time this photo was taken).
 And here, looking along the loft towards the stairwell gable with its two trapezoid windows (one covered temporarily in sheathing as mentioned earlier). You will see the start of the internal wall framing for the end of the en-suite bathroom on top of that timber beam in a later photograph).
 This photo is looking up at the overhang roof on my front deck.
 Here, taking the stand back view, you will see the roof system has been covered in waterproofing peel and stick. This is not actually anything to do with waterproofing the roof long term, but an interim precaution (cost me $1800 in materials and $420 in labour) to protect the T&G should we have any heavy rain (a very rare commodity in this semi arid region of BC during the months of July and August but nevertheless it would stain the T&G) prior to the subsequent build of a 2"x8" insulation frame over the T&G roof deck, then the spray foam insulation into that frame, then the sheathing over that, followed by water and ice sheeting, and finally the fitting of the metal roof - all work that will progress over the next 4-6 weeks as various contractors come on site to do their part.
 I also had my plumber on site for 1½ days of the week of 23rd July doing the rough-in of my under slab plumbing and radon mitigation. He had already installed the runs where plumbing goes under some footings in April. Now he had to connect those parts up and provide the runs for various parts of the house prior to the concrete slabs being poured.
In this next photo you can see here the plumbing comes under the ICF wall between the garage and the house .....
 ... and then runs in a direct line past the central pad that supports the column going up to the over garage deck roof ...
 .., and here exits out through the foundation wall to where it will later connect into the septic tank.
 Below we are seeing the various drain lines under the mechanical room, one exiting under another footing that takes the drain from both basement en suite bathrooms, and the stack that will receive grey and black water from the main and loft floors above.
 Here is one set of plumbing from one of the two en suite bathrooms.
 All this piping runs horizontally but with a minimum slope of a 1/4 inch per 1 foot. I failed to photograph the radon mitigation piping (with the exception of one of the following photos that just barely shows it buried in radon rock). Radon drain rock is a 3/4" graded and washed rock that will allow any ground radon to percolate out and be carried away from the house via the perforated radon mitigation piping through a roof stack. This is a relatively recent building code requirement.
The next photos show the rock slinger pouring on average a 6" layer of washed 3/4" rock over the base ground up to a marked line on my foundation walls.


 My job over the next week is to first hand level this rock, and then machine compact it ready for subsequent installation of the vapour seal, slab insulation, hydronic heating loops and slab concrete pour. The garage will also have a similar rock pour so as to provide a good base for the concrete slab and any drainage below, but as there is no enclosed living space above the garage which might pose a risk from radon gas to its inhabitants, it is a much cheaper drain rock.
So, what were the problems that had to be resolved.
First and foremost, neither I, nor my two main contractors who each have a crossover role responsibility in this part of the build, had really appreciated sufficiently in advance that the engineer had stated on his structural drawings for both the porch roof dormer (which protects the walk round from the front deck to the over garage deck and the front entrance at ground level from snow and rain), and the rear loft shed dormer, were meant to be built using pre-manufactured trusses.


While an easy option plan for the engineer at the time he was producing his structural drawings, the reality that became suddenly evident to all of us on site was that to have these manufactured by "Structural Truss" would be expensive and take 4-6 weeks minimum - a delay that would have been hugely limiting at this stage of the build, especially as the subsequent over framing for the insulation can only be built once the porch roof and shed dormer are in place. Further, there was concern that the porch dormer measurements for each consecutive truss might lead to a potential area of controversy once delivered on site for subsequent fitting by my contractors. What was needed, in order to circumvent the potential delay and problems, was for my contractors to propose a more conventional on-site construction solution and for the engineer to then calculate that proposal for snow loads, wind etc, stipulating timber sizes and fastening as part of his approval process. This has inevitably meant I will face a small additional engineering bill, but this will probably balance out along with buying the raw materials versus the alternative cost of buying manufactured structural trusses with their inevitable profit margin mark-up. But to agree such a solution itself took the best part of 10 days, and I am now beadily watching and photo documenting this on site work so my engineer can subsequently review and sign off that it meets his structural design standards.
On-site work on the porch dormer started only last Thursday, with the best part of the day being spent between both Bob Damstrom and Jason Olesen working together on this one. Basically the engineer had approved Bob to build a front truss that will be visual using sawn 2"x10" lumber lower and upper chord truss plus a 2"x6" ridge. These were assembled on site and eventually lifted into position and bolted into the existing roof timbers.


 From here, Jason will then build the rest of the trusses in place using 2"x10" timbers for the top chords and 2"x6" timbers for the bottom chord, spacing each truss at 24" spacing, and building these with materials I have purchased in from Home Hardware.
 I'll talk through the loft shed dormer (which was resolved rather more easily) later in this post.
The other significant problem was that it became apparent that the line of the walk round from the front deck to the over garage deck was not fully protected from a roof snow slide (the very purpose of that porch roof) as the deck line exceeds the porch roof over hang. The photo below (taken in early July) indicates the area of the problem. When looking above at the roof rafters where the porch dormer will sit, reveals that the area that is not adequately protected, leaving at least the guard rails and potentially the edge of the walk-round deck vulnerable.
 To be fair this was not readily apparent in looking at all the drawings, at least to my eyes, and only became so when the deck layout was in place. While I could point fingers at various parties who should have identified this before we started building, I do not consider a blame culture helpful, and would far rather such an error was brought to my attention at this stage, rather than people burying their heads in sand and hoping the problem will never be found out. I have always been very open and up-front with my contractors - mistakes are made, and rather than pointing blame, the important issue is to find a solution. For those readers who know me well and maybe are surprised by my attitude, I learnt long ago in the RN that this management rationale works much better. In addition, noting I am on site every day, just think how many mistakes in a modern house are made and well hidden from the eventual owners who were none the wiser as to what went on during the build.
But back to the subject in hand, for this particular walk-round deck problem, I will suck up the cost of removing two of the sono tube footings and installing two new ones in revised positions, and this will happen in a couple of weeks time when I have Dale Bryant back on site to dig my septic system, and then we will pour the concrete into those sono's at the time of pouring my basement slabs. Bob Damstrom will then re size and reposition the posts and beams for the walk-round.
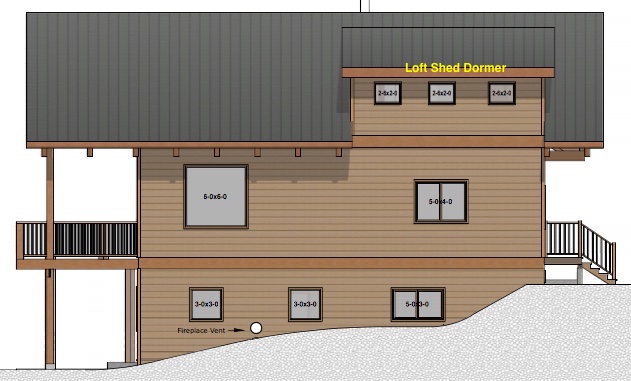
The other item that arose, while not actually a problem, involved a bit of re-thinking and double checking with both my engineer and the local building planning authority. Both Bob Damstrom and Jason Olesen suggested that by swapping my master bedroom and en suite bathroom around, I could capitalise much better on the available loft space, improve the views from my master bedroom north up the lake (rather than a rather dull view up the hill behind my house), and overall add to the wow factor. The sketch below was the original planned loft layout, with the en suite bathroom and walk in closet to the right of the house (as you face the back) in the shed dormer area, and the bedroom under the main roof timbers on the left of the loft. (Forgive the fact I have the picture upside down but this allows you to get the perspective looking from the front of the house to the rear before you look at my subsequent sketch of the revised plan).

Taking the same front to rear perspective of the loft area, the following sketch, while still a bit of a work in progress, has the bedroom now in the shed dormer area, with the bathroom in the more cave like timbered roof area. To give a sense of scale, each square in the diagram below represents one foot of measurement. The bedroom area will now be in the higher ceiling shed dormer on the right with a floor area of 19 feet by 15 feet and not have to deal with low head height from one of the valley beams, with the bathroom, walk in closet and dressing area to the left below the beams (you'll note I have marked this as a desk area with a small internal ventilation window, but reality is it could be a dressing area). The aim with those half height screening walls is to try and maintain the best of the views of the major ridge beam roof timbers above.
 Once Jason's team had returned from their four day plus sojourn to Sweetwater, they continued framing the gables, some of which you have seen in the pictures further above, the shed dormer, and some of the loft suite walls, as well as working with Bob D on the initial build of the porch roof front truss described above.
Here are a few photos of the front gable framing. In the first one the spaces and blocking on the inner side will be spray foam insulated prior to drywall or T&G (I have yet to decide).
 On the outside Jason used Roxul batt insulation to fill the cavity between the ledgers and the external sheeting, in order to minimise the areas of thermal bridging.
 Here below is the front gable framing complete and now ready installation of the 12' sliding glass doors, transom and trapezoid windows, and subsequent cedar siding (so it looks like a wood rather than concrete house).
 Up in the loft work was underway to build the shed dormer and frame the inner walls. In this next photo a large piece of 2"x12" sawn timber is attached to the opposite sides 6"x12" timber rafters previously spaced at 48" spacing. The dormer roof uses a different concept to the house rafters, using 2"x12" joists at 16" spacing that will tie in with the rest of the roofs 2"x8" over roof insulation framing. Unlike the rest of the house, this loft rafter system will not be visual from underneath, but I will probably sheet this area from below with T&G in order to maintain the wood theme.
 Here I am now looking from what will be the bathroom area (under the timber arches) into the bedroom area with its framed dormer walls and roof.
 Here we are looking at the rear wall of the loft, the left hand side being the natural 8:12 roof line, and the right hand side being the 3:12 shed dormer roof slope. You can see the door that will lead out onto my narrow but private 4' bedroom deck, the window the other side of the timber column (this column will remain exposed when the wall is covered in drywall or T&G) next to where the vanity sink counter will go, and where hidden by sheathing, a smaller window where the enclosed toilet will be sited.
 A few quick looks at the bedroom deck area. It will obviously be eventually finished with proper deck planks and guard rails!


 Below, looking from the bedroom area into what will become the walk in closet on the left and the bathroom area in the middle and to the right. Neither the end wall or the left hand wall before the gallery are yet completely framed, but the start gives you the overall impression.
 And looking from the rear of the loft to the bedroom door before stepping out on the loft gallery overlooking the Great Room below.
 Below, the 4' wide loft gallery walk way. Again, this will have a suitable guardrail - eventually, and before I am allowed to move in!!!!
 A few aspect views of the outside of the shed dormer. My intention at present is this will also be sided in cedar to blend in with the rest of the cedar siding that will cover the ICF.


So, all in all a relatively busy few weeks, notwithstanding de-conflicting contractors, one swapping between two clients as progress and space on my site dictated, public holidays, and key to managing this project and keeping pace moving, finding solutions to overcome some unforeseen problems and a mistake.
I have come to the conclusion its perhaps dangerous to predict where progress will be in two weeks time. I think in my last blog I reckoned we were now 5 weeks behind best case timing in this build, and I would say now we are at least six weeks behind where we had hoped to be, not helped by the need to find solutions to the aforementioned problems. Straight after I post this blog I will be emailing my window supplier to finally place that order, having this last two weeks tweaked the plan for the revised loft layout and its consequent new window plan. I would anticipate delivery in about 4 weeks time. I also need to make a trip to Kalispell in Montana in the next two weeks to talk both with my engineer and RBM Lumber who are building my front door. Work on site for Jason's team will focus on completing the build of the loft dormer and loft area faming, the porch dormer, building the 2"x8" insulation framing above the current roof system, and undertaking various slab prep work (drain rock compaction, vapour seal, insulation etc) that leads into the plumber being able to fit his hydronic loop prior to the concrete slab pour. Anybody's guess how much we will get done in the next two weeks, but until next time...
Cheerio!

In this photo we are looking up to the underside of the over garage deck roof. I am particularly pleased with the natural look this provides as there are three houses on the Koocanusa Ranch development with similar covered outdoor deck themes, but all use synthetic materials for their roof lining, in theory because they will last longer (I doubt it) and maybe because they cost less. There is no doubt in my mind this roof blends with the frontier mountain environment so much better.


In this next photo you can see here the plumbing comes under the ICF wall between the garage and the house .....


The next photos show the rock slinger pouring on average a 6" layer of washed 3/4" rock over the base ground up to a marked line on my foundation walls.


So, what were the problems that had to be resolved.
First and foremost, neither I, nor my two main contractors who each have a crossover role responsibility in this part of the build, had really appreciated sufficiently in advance that the engineer had stated on his structural drawings for both the porch roof dormer (which protects the walk round from the front deck to the over garage deck and the front entrance at ground level from snow and rain), and the rear loft shed dormer, were meant to be built using pre-manufactured trusses.

While an easy option plan for the engineer at the time he was producing his structural drawings, the reality that became suddenly evident to all of us on site was that to have these manufactured by "Structural Truss" would be expensive and take 4-6 weeks minimum - a delay that would have been hugely limiting at this stage of the build, especially as the subsequent over framing for the insulation can only be built once the porch roof and shed dormer are in place. Further, there was concern that the porch dormer measurements for each consecutive truss might lead to a potential area of controversy once delivered on site for subsequent fitting by my contractors. What was needed, in order to circumvent the potential delay and problems, was for my contractors to propose a more conventional on-site construction solution and for the engineer to then calculate that proposal for snow loads, wind etc, stipulating timber sizes and fastening as part of his approval process. This has inevitably meant I will face a small additional engineering bill, but this will probably balance out along with buying the raw materials versus the alternative cost of buying manufactured structural trusses with their inevitable profit margin mark-up. But to agree such a solution itself took the best part of 10 days, and I am now beadily watching and photo documenting this on site work so my engineer can subsequently review and sign off that it meets his structural design standards.
On-site work on the porch dormer started only last Thursday, with the best part of the day being spent between both Bob Damstrom and Jason Olesen working together on this one. Basically the engineer had approved Bob to build a front truss that will be visual using sawn 2"x10" lumber lower and upper chord truss plus a 2"x6" ridge. These were assembled on site and eventually lifted into position and bolted into the existing roof timbers.


The other significant problem was that it became apparent that the line of the walk round from the front deck to the over garage deck was not fully protected from a roof snow slide (the very purpose of that porch roof) as the deck line exceeds the porch roof over hang. The photo below (taken in early July) indicates the area of the problem. When looking above at the roof rafters where the porch dormer will sit, reveals that the area that is not adequately protected, leaving at least the guard rails and potentially the edge of the walk-round deck vulnerable.

But back to the subject in hand, for this particular walk-round deck problem, I will suck up the cost of removing two of the sono tube footings and installing two new ones in revised positions, and this will happen in a couple of weeks time when I have Dale Bryant back on site to dig my septic system, and then we will pour the concrete into those sono's at the time of pouring my basement slabs. Bob Damstrom will then re size and reposition the posts and beams for the walk-round.
The other item that arose, while not actually a problem, involved a bit of re-thinking and double checking with both my engineer and the local building planning authority. Both Bob Damstrom and Jason Olesen suggested that by swapping my master bedroom and en suite bathroom around, I could capitalise much better on the available loft space, improve the views from my master bedroom north up the lake (rather than a rather dull view up the hill behind my house), and overall add to the wow factor. The sketch below was the original planned loft layout, with the en suite bathroom and walk in closet to the right of the house (as you face the back) in the shed dormer area, and the bedroom under the main roof timbers on the left of the loft. (Forgive the fact I have the picture upside down but this allows you to get the perspective looking from the front of the house to the rear before you look at my subsequent sketch of the revised plan).
Taking the same front to rear perspective of the loft area, the following sketch, while still a bit of a work in progress, has the bedroom now in the shed dormer area, with the bathroom in the more cave like timbered roof area. To give a sense of scale, each square in the diagram below represents one foot of measurement. The bedroom area will now be in the higher ceiling shed dormer on the right with a floor area of 19 feet by 15 feet and not have to deal with low head height from one of the valley beams, with the bathroom, walk in closet and dressing area to the left below the beams (you'll note I have marked this as a desk area with a small internal ventilation window, but reality is it could be a dressing area). The aim with those half height screening walls is to try and maintain the best of the views of the major ridge beam roof timbers above.

Here are a few photos of the front gable framing. In the first one the spaces and blocking on the inner side will be spray foam insulated prior to drywall or T&G (I have yet to decide).


So, all in all a relatively busy few weeks, notwithstanding de-conflicting contractors, one swapping between two clients as progress and space on my site dictated, public holidays, and key to managing this project and keeping pace moving, finding solutions to overcome some unforeseen problems and a mistake.
I have come to the conclusion its perhaps dangerous to predict where progress will be in two weeks time. I think in my last blog I reckoned we were now 5 weeks behind best case timing in this build, and I would say now we are at least six weeks behind where we had hoped to be, not helped by the need to find solutions to the aforementioned problems. Straight after I post this blog I will be emailing my window supplier to finally place that order, having this last two weeks tweaked the plan for the revised loft layout and its consequent new window plan. I would anticipate delivery in about 4 weeks time. I also need to make a trip to Kalispell in Montana in the next two weeks to talk both with my engineer and RBM Lumber who are building my front door. Work on site for Jason's team will focus on completing the build of the loft dormer and loft area faming, the porch dormer, building the 2"x8" insulation framing above the current roof system, and undertaking various slab prep work (drain rock compaction, vapour seal, insulation etc) that leads into the plumber being able to fit his hydronic loop prior to the concrete slab pour. Anybody's guess how much we will get done in the next two weeks, but until next time...
Cheerio!
I see that 'close enough for government work' does not apply to your build! I also subscribe to the philosophy of no blame game, it rarely helps. When do you reckon you will actually move in?
ReplyDeleteYep, absolute "standards" for my build. With our backgrounds we inevitably think alike on the no blame game. As for moving in, probably six weeks behind now on best case timelines, but hoping I might have it to lock up late September, and while far from finished internally, get my occupancy certificate (functioning bathroom, bedroom, kitchen and safety aspects in place) late October.
ReplyDelete👍🏼
Delete