Going Up.
Having reached "main floor" in my last update some 3 weeks ago, this post focuses primarily on the build of the next rise of wall, hence "going up." Not as Theresa May might have felt on the night of UK's election on Thursday 8th June, a feeling of "going down." The whole ghastly Brexit debacle back in UK appalls me from afar, but also brings to mind a joke I heard a year ago, immediately following UK's Brexit referendum: "There are currently two countries in the world trying to f... themselves up, UK and USA. But the USA has the Trump card." For all the divided opinions and divisive media furore in the country of my origin, think yourselves lucky Donald Trump is not your leader, or the "pretty boy" here in Canada. Politicians, get on with it and for just this once, unite for UK's better good!
I concluded my last post on Sunday 4 June with the aim of publishing again weekend of 17-18 June and hoping to have achieved five pieces of work. The build of the main floor ICF wall, the egress well window for the inner of the two basement back bedrooms, then back fill of that rear basement wall that will be below grade, and I said maybe, just maybe, the load bearing walls and loft floor system. Well, much though my contractor was so very positive, that plan proved unrealistic - we only achieved two of the five i.e. the well window and the next wall. Progress was delayed not least by Donald not returning to work for the first week due to his illness, depleting Jason's team, a couple of days of inclement weather, and other minor work outside my build that took the team off site for two days. Even then, the team were ready for a concrete pour by Thursday 15th, but with the build season now at full throttle, demand for both concrete trucks from one supplier plus Dano's (Top Notch Concrete Pumping) colossal pump truck that is essential for the extended reach over my build site, meant we could not align both until Tuesday 20th June. That day had been booked for Home Hardware to deliver the framing materials needed to continue work after the concrete pour, but as space had to be kept clear for the pump and concrete trucks, that delivery had to be put back to the next available slot of this last Friday. Lots of time lost due to demand exceeding supply at this time of year.
So to the build of the main floor walls. Work started on Monday 5 June with the tying in of the vertical rebar to the parts that remained poking out of the top of the earlier basement walls. In this photo here, taken from my over garage deck (with temporary waterproofing tarpaulin to protect my T&G paint shop below) we are looking through the side of the house with two gaps for doors (one via laundry to dining room and kitchen at rear, and one via main landing to the great room).
 The front ICF wall will be merely a couple of feet either side of what later will be a mix of a wood framed wall and a huge amount of glass, and you can see in the photo below the gap being left for this wall, and below that a trailer loaded with ICF blocks. As we were only building three external walls on this floor in ICF, as opposed to earlier on at the walkout basement level four external walls, plus the garage and an internal and buttress wall, the ICF quantity was almost a ⅓ of that used in the earlier build.
 Rebar spacing at the front very short ICF wall either side of the future framed and glass wall remained at the lower levels tight 6" vertical spacing and 12" double horizontal spacing using over sized 20mm rebar, well above building code but to my engineers specifications in order to strengthen that wall (it will have an 11' extended roof and ridge beam over the front deck) from risk of wind or seismic forces. Elsewhere on the two side walls and rear wall, the engineers requirement was for a more minimalist 18" horizontal and vertical spacing that is closer to building code, but still using 15 mm as opposed to code 12.5 mm rebar. But that said, as the vertical spacing in the basement rear wall had been previously set at 12" it was simpler to exceed his requirement and tie in to that same vertical 12" spacing, and horizontally to fit the Superform ICF pre-designed 12" horizontal slots.
 Also on the same Monday we took a very small delivery of concrete for the footings of the egress well window. No big pump truck this time, just a wheel barrow and physical effort to get it round the back of the still open footing.


 Work then continued for just over a week building up the main wall ICF forms and in filling with rebar, the week window forms (not ICF), and then preparing all the bracing that ensures alignment is maintained during subsequent concrete pour. A few pictures.
Here you see the left hand front wall of the house, with a huge 6'x6' picture window, and the short ICF wall at the left of the front wall prior to later wood framing and installation of glass doors and windows.

 This photo below is a view looking out from the centre of the floor area to the right of the front prow wall and towards where the main floor stair landing will be. The high window in that area is quite deliberate - it is measured so I can build in a small desk and sit an iMac below the sill, and then fit a filing cupboard to the left in the corner. To the right is one of the doors that will give access to the over garage open air but roof covered deck.

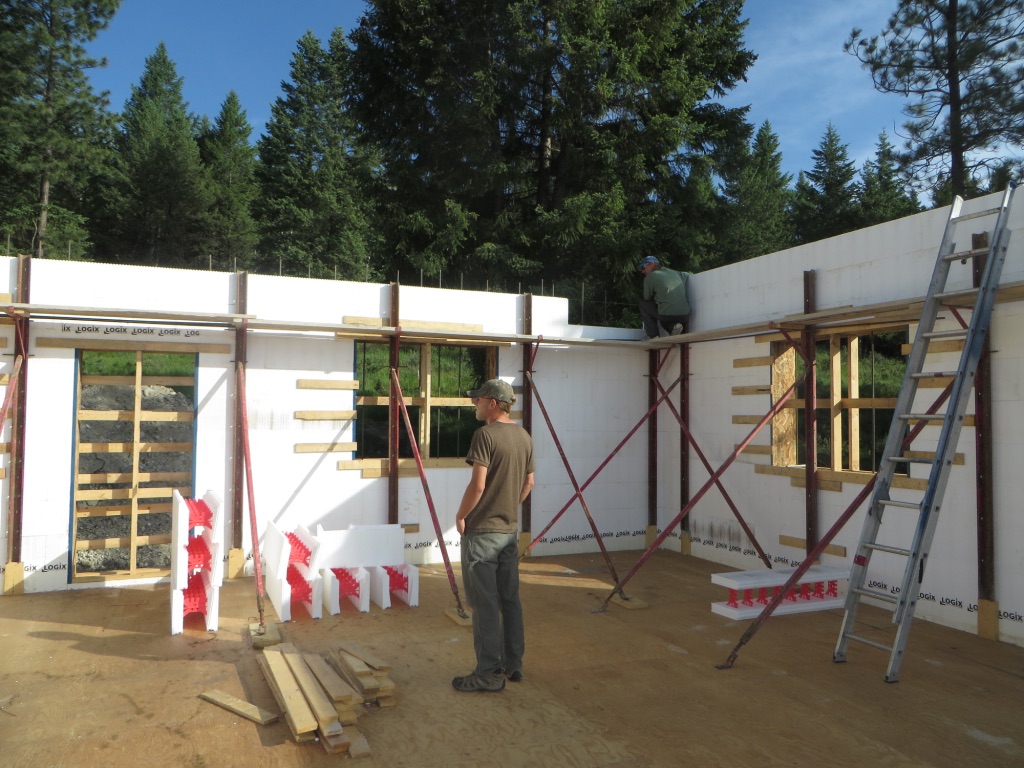
 Below you are looking from the dining area through where there will soon be a load bearing framed wall, both supporting the loft floor system and separating the dining room from the laundry and a small separate powder room (cloak room or toilet in UK parlance). And beyond that the other door out onto the over garage roof deck.
 And here we are looking into the opposite rear corner where the kitchen will be.
 Taken Monday 19th June, the day before the concrete pour, here below is a view along the right hand wall that separates the house entrance foyer and stairwell etc from the garage roof deck. You might note the ICF here, rather than the 6½" width for concrete, widens to a 10" profile. This will further spread the load bearing of the timber roof system that will sit on these walls.
 Looking down over where the stair system will later be built.
 Looking along the back wall. You'll notice in the foreground of the picture there is a drop of one course of ICF equating to 1'. This is where the loft bedroom floor system will sit on the wall, and a 4' cantilevered deck will be attached 8' back into the floor joist system.
 Looking down at the egress well window, wood board forms in place for concrete pouring. No ICF required here for insulation etc. As you will see in a later post, the outside of this will be hidden by land back fill, and much of the inside will be filled with drain rock up to the window sill so that any rain can percolate straight down to the Big O drain system that surrounds the house footings.
 Looking out to the front.

I was on site for some of this work during the first of the last three weeks but also had some time away preparing for other "future ops" both with a visit to Calgary and staining the structural roof timbers and supporting post and beams in Bob Damstrom's yard (Damstrom Log and Timber Homes http://www.damstrom.com).
My visit to Calgary was at the end of the first of this last three weeks, departing at o'crack sparrow, driving for four hours, and talking to a number of suppliers, while also taking the opportunity at then end of a long day to have a few beers downtown and an overnight stay.
But the prime reason for the trip was to talk some items through with my window supplier as I had as good as decided to change the window and door configuration on the front prow wall, but needed to visit them to finalise that decision. The original configuration was as below, with two 6' wide patio garden opening doors, and awning transom above, and two largish windows either side. I had already changed my original plan from opening garden doors you see in the architects drawing below to a sliding door of same size either side of where the structural column will support the ridge beam, as I feel sliding doors are both neater and more airtight.
 More recently I had been debating changing these 6' wide frames with their 3' slider and the adjacent side windows to a more impressive 12' wide sheet of glass either side of the central column, each of which would have two central sliding doors providing a 6' opening in each frame, and extending the transom awning over the top. The drawing below indicates my revised plan and I am sure readers will agree the change will add "wow factor" to the great room. I hasten to add the frames will not be that bright blue! Inevitably there is an increase in cost for this configuration (approx $3,000) plus a change by my engineer to the overhead ledgers attached to the concrete ICF and central column (approx $400). Keen not to increase design spec, as any such change will always lead to increased cost, this one is worth the decision, and is now agreed with my window supplier.
 I also visited two other possible suppliers, one for some rock veneer facing for part of my front basement walkout wall, and the other to do with a waterproofing system for the over garage deck prior to its concrete overlay pour. In addition I bought an 18' long 8' wide dual axle trailer capable of carrying 5000 lbs of load and drove this back on the Saturday PM. Why? While the F150 beast does well for anything that can fit just beyond the 6½' load bay, I am paying others to haul a huge amount of materials that with the right equipment I could haul myself and more than pay back the cost of the trailer, thereafter having it for longer term needs such as winter firewood cutting (we are allowed to cut up and extract all lying or free standing dead wood from crown land for own use) and transport of various mountain toys such as ATV's etc.
 As a brief aside, in the picture above the half stained planks are the deck joists for my 4' loft bedroom cantilevered deck I mentioned earlier. The wood is only stained on the exposed parts.
Moving on from that aside, I have also spent the best part of six days over the latter two weeks off site staining the large main timbers for my roof system (as well as what you see just described above). Readers will recall from my last post the amount of time I and my landlord Chris Walsh spent painting the T&G that will go into my roof system. The large timbers for the roof and the supporting post and beam system had been cut some time ago, and Bob Damstrom has been undertaking all the joinery work over this last couple of weeks ready for his part in my build. I had agreed in our contract to undertake the staining myself as a cost saving measure, and this was the opportune time to do this. The following photos give a feel for what is going into the structural part of my roof.
The timbers in this next photo are the Fir ridge beams, essentially 20" diameter shaped and cut tree trunks.

 These 14"x14" Fir timbers are the rafter carriers that will sit on top of sill plates that separate them from the top of the concrete walls. Here Bob is blowing all the sawdust away prior to my staining work.
 Dom preparing some 45 degree joins for where certain pieces will sit on the corner walls.
 Some of the rafter carriers on completion of my staining in a light walnut colour. I intend the other heavy main structural timbers such as the ridge beams and main supporting columns will be stained the same, while the rafters will be clear coated, the same as the T&G done a few weeks ago.
 Joinery work and rough brush sanding on the 6"x12" Fir rafters.
 And a few samples pictures of the first 28 rafters I stained in a clear coat. I was particularly impressed with the result, as in spite of its "clear" title, it really accentuates the Firs reds and brown grains. The notches you see below are where the rafters will sit on and be bolted to the aforementioned rafter carriers that will sit astride the walls.
 This end is where the rafters will sit astride and be bolted to the ridge beam and the opposite rafter.
 Meanwhile back on site, as explained in my intro to this post, the team could have been ready for concrete pour by Thursday 15th, but lining up concrete trucks from one supplier and pump truck from another meant concrete pour had to be held off until Tuesday 20th, effectively losing 3 days of progress. This time we had a delivery of 22 CuMs of concrete, rather less than the 42 we had in the much more extensive external and internal basement wall system for house and garage, and only 3 trucks as opposed to 11, as the road weight restriction that is in place during the weeks after the thaw, ostensibly to protect the roads while prone to movement from ground heave, had been lifted.


 Jason's team used the Wednesday and Friday (they took Thursday off as there was actually not that much to do until the re booked Home Hardware materials could be delivered) to clear the site of the various bracing and prepare for the next phase of work. In this photo below, looking back to the kitchen diner area, all the bracing has been removed but the scaffolding is still in place for the next stage of work over the next two weeks. The rods you can see protruding up from the right hand wall are not remnants of the rebar, but ⅝" galvanised rods embedded 8" into the concrete and sticking up another 14". These will be used initially to bolt down the pressure treated wood sill plates (pressure treated so not damaged by moisture that will come out of the concrete over the next two years), and then on top of those will be bolted the 14"x14" timber rafter carriers. You can also pick out the rim joist wall bolts as part of the loft floor support system, a beam pocket for an LVL beam, and at the rear the 1' recess where the floor system and the cantilevered 4' bedroom deck will sit astride the rear concrete wall.
 This photo below gives a close up of that external wall explained above. The two beam pockets will take a 12" LVL beam (to be hidden in the joist floor system) and at the front an 18" dropped LVL beam, which as exposed will be dressed later to look like a timber beam. (As explained in an earlier post, LVL's are not pretty but are both cost effective and far stronger in the horizontal plane than a raw timber beam).
 On the opposite wall are two smaller beam pockets that will accommodate two exposed 6"x8" Fir staircase headers - these spanning a mere 11½' as opposed to 32'.
 Looking to front, Jason's team are drilling in and cementing more rods with which to bolt down the sill plates and the 14"x14" rafter carriers. While on the other wall these were wet dowelled immediately after the concrete pour, the speed the concrete dried at meant it was not possible to wet dowel these rods all around.
 Friday 23rd, was much twiddling of my fingers and getting very frustrated at time being wasted as I could have been continuing the staining work in Bob's yard. I had been told my delivery would be the first drop off at approx 1000; it eventually arrived at 1300, only to find the load was far from complete. Further venting of frustration on the phone, with comments about "right hand this is left hand, over" and making it clear how irked I was as I had put extensive effort on my part into refining this order, been into Home hardware three times to do so, and had been assured all materials would be delivered. The delivery was critical to timing of next weeks work on the Monday (Jason has to be in Calgary Tuesday and Wednesday on family matters) prior to him and Bob Damstrom working in conjunction Thursday with an expensive crane rental on site to lift the central column into place. That column is integral not only to Bob's subsequent construction of the roof system, but also to Jason's build of the loft floor system. After much slightly heated persuasion, the missing part of the order was delivered yesterday (Saturday).


 In order to give you a feel for the stunning views I will be able to enjoy, I thought I'd leave you with a few scenic shots taken from the front edge of the main floor where my sliding windows will be installed and lead out onto a 12' front deck.
Scanning right to left, this first photo is looking almost South down the lake towards Montana. The lake (reservoir) is progressively rising, last month at about 2½' a day with the early summer fast melt run off, and now about 1' a day.


I'll aim to do an update again in two weeks, by which time the plan (maybe) is to have the back fill completed on the rear wall, some of the critical timbers in place that will integrate with the loft floor and support the roof system, the framed load bearing wall below on the loft floors left side, plus other non load bearing framed walls that separate the 38' x 30" open plan great room/diner/kitchen from the laundry, powder room and stairs off to the side.
Toodle Pip!
So to the build of the main floor walls. Work started on Monday 5 June with the tying in of the vertical rebar to the parts that remained poking out of the top of the earlier basement walls. In this photo here, taken from my over garage deck (with temporary waterproofing tarpaulin to protect my T&G paint shop below) we are looking through the side of the house with two gaps for doors (one via laundry to dining room and kitchen at rear, and one via main landing to the great room).


Here you see the left hand front wall of the house, with a huge 6'x6' picture window, and the short ICF wall at the left of the front wall prior to later wood framing and installation of glass doors and windows.

This next photo is the opposite right hand edge of the front wall, and shows its close rebar spacing as mentioned earlier.


I was on site for some of this work during the first of the last three weeks but also had some time away preparing for other "future ops" both with a visit to Calgary and staining the structural roof timbers and supporting post and beams in Bob Damstrom's yard (Damstrom Log and Timber Homes http://www.damstrom.com).
My visit to Calgary was at the end of the first of this last three weeks, departing at o'crack sparrow, driving for four hours, and talking to a number of suppliers, while also taking the opportunity at then end of a long day to have a few beers downtown and an overnight stay.
But the prime reason for the trip was to talk some items through with my window supplier as I had as good as decided to change the window and door configuration on the front prow wall, but needed to visit them to finalise that decision. The original configuration was as below, with two 6' wide patio garden opening doors, and awning transom above, and two largish windows either side. I had already changed my original plan from opening garden doors you see in the architects drawing below to a sliding door of same size either side of where the structural column will support the ridge beam, as I feel sliding doors are both neater and more airtight.


Moving on from that aside, I have also spent the best part of six days over the latter two weeks off site staining the large main timbers for my roof system (as well as what you see just described above). Readers will recall from my last post the amount of time I and my landlord Chris Walsh spent painting the T&G that will go into my roof system. The large timbers for the roof and the supporting post and beam system had been cut some time ago, and Bob Damstrom has been undertaking all the joinery work over this last couple of weeks ready for his part in my build. I had agreed in our contract to undertake the staining myself as a cost saving measure, and this was the opportune time to do this. The following photos give a feel for what is going into the structural part of my roof.
The timbers in this next photo are the Fir ridge beams, essentially 20" diameter shaped and cut tree trunks.


Scanning right to left, this first photo is looking almost South down the lake towards Montana. The lake (reservoir) is progressively rising, last month at about 2½' a day with the early summer fast melt run off, and now about 1' a day.

Looking across where still a river, it has breached both sides and at current rates of rise, I anticipate this will be a complete stretch of water in about 2-3 weeks.

Looking NNE towards Buffalo Head.


I'll aim to do an update again in two weeks, by which time the plan (maybe) is to have the back fill completed on the rear wall, some of the critical timbers in place that will integrate with the loft floor and support the roof system, the framed load bearing wall below on the loft floors left side, plus other non load bearing framed walls that separate the 38' x 30" open plan great room/diner/kitchen from the laundry, powder room and stairs off to the side.
Toodle Pip!
Yep, the redesign of the great room windows is a tip top idea. Will the windows and doors be double glazed?
ReplyDeleteThought you'd approve. Yes, all windows of high quality double glazing design - single glazing not allowed here due to climate extremes. I had considered triple glazing just the windows in the front prow, as there is so much glass on that wall, but when you do a cost benefit analysis of increased cost to buy them versus fuel savings over already good quality double glazing, it takes about 15 years to pay back the difference. Added to which triple glazing further reduces light and UV (not good for indoor plants).
Delete